Stardew Valley Complete Guide: From Beginner to Perfection
Stardew Valley is a farming simulation created by solo developer Eric Barone, known as ConcernedApe. The game has sold over 41 million copies as of December 2024, with PC accounting for 26 million copies and Nintendo Switch users making up 7.9 million. Barone was the sole developer from 2012-2019, creating all art, sound effects, and music himself after studying computer science.
The game tasks players with revitalizing their inherited farm in Pelican Town. Players can engage in farming, fishing, monster fighting, and treasure mining. The inspiration came from Barone's dissatisfaction with the Harvest Moon series direction.
Perfection Achievement
This achievement requires reaching 100% completion by mastering all 6 skills, shipping every crop, crafting every recipe, and finding all 130 Golden Walnuts. The Perfection Tracker is located in Qi's Walnut Room on Ginger Island. Reaching 100% Perfection typically requires 250+ hours and multiple in-game years.
The official Stardew Valley Wiki at stardewvalleywiki.com serves as the ultimate companion resource. This resource helps players achieve Perfection by providing information on mastering all 6 skills, shipping every crop, crafting every recipe, and finding all 130 Golden Walnuts. Players can reference the wiki throughout the 250+ hour journey to 100% completion.
Getting Started with Stardew Valley: First Week Success
Your First Week Priorities
Focus on clearing your farm, planting parsnips, meeting villagers, and conserving energy while learning basic mechanics like watering crops, foraging, and fishing. Energy Conservation: The practice of managing your stamina to maximize daily productivity is a critical factor for long-term success.
Mastering Tool Upgrades
Tool Upgrade Priority
Watering Can is the highest priority tool upgrade. This is because it:
- Reduces energy cost per use
- Allows for more watering actions
- Upgraded versions water multiple tiles simultaneously
Plan watering can upgrades around rainy weather since you can't water crops during rain. This strategic timing ensures you won't lose a day of crop care while your essential tool is unavailable.
Upgrade Process and Timeline
Clint's Blacksmith Shop: The location where all tool upgrades are performed operates daily from 9am to 4pm. Each tool progresses through four material tiers:
- Copper
- Steel
- Gold
- Iridium
Important Constraints:
- Only one tool can be upgraded at a time
- You must complete each tier consecutively
- You cannot skip ahead or upgrade multiple tools simultaneously
Recommended Upgrade Sequence
- Watering Can (highest priority)
- Hoe (second priority)
- Pickaxe (third priority)
- Axe (fourth priority)
An upgraded hoe allows you to till multiple tiles at once, dramatically speeding up field preparation.
Energy Management Benefits
Early tool upgrades are particularly important because they reduce energy consumption, allowing you to accomplish more tasks without depleting stamina. This efficiency gain compounds throughout your farm work, giving you more time and energy for exploration, foraging, and building relationships.
Essential Wiki Navigation Tips
The Stardew Valley Wiki serves as the definitive digital companion and '#1 resource' for the country-life RPG. It functions as a well-organized encyclopedia with intuitive categorization mirroring the game's core activities: farming, fishing, mining, crafting, and exploring.
Mastering the Wiki's Core Organization and Search
Effective wiki search techniques include:
- Using exact item names for accurate results
- Including seasonal indicators for time-sensitive information
- Searching for specific villager names
These methods help you find information quickly. The wiki's toolbar functionality allows for efficient browsing of related topics through strategically placed internal links, connecting related content throughout the site.
Advanced Wiki Features
Quick Reference Tables: Feature sortable item statistics and prices Visual Guides: Provide screenshots for accurate identification Update Tracking: Keeps information current with game patches
The wiki excels at organizing time-sensitive information including detailed seasonal fishing charts, crop planting schedules, and villager availability calendars.
Seasonal Navigation Tips
- Using seasonal categories for quick availability checks
- Cross-referencing fishing seasons with weather patterns
- Checking villager schedules before gift-giving routes
Optimizing Your Wiki Workflow
The wiki provides comprehensive platform-specific controls and gameplay differences for PC, Xbox, and mobile devices. This ensures you have accurate information for your chosen platform.
The Controls section includes advanced techniques like 'power-up' tools that allow the Watering Can to act on multiple tiles simultaneously.
The wiki's interconnected design allows players to navigate seamlessly between related topics. For instance, clicking on a villager's name provides gift preferences and links to related quests, heart events, and schedule information.
Best Practices
- Creating bookmarks for frequently accessed pages
- Developing a personal note-taking system for complex information
- Regularly reviewing updated pages
Beginner Progression Guide: First Year Strategy
Spring: Laying the Foundation
Your first spring should focus on specific crops to maximize early profits and Community Center completion:
- Parsnips: Plant on day 1
- Cauliflower: Plant on day 9
- Potatoes: Plant on day 13
- Kale: Plant on day 17
Community Center: A central location where you complete bundles to unlock rewards and restore the town's community facilities.
Quality Crops Bundle: This Community Center bundle requires five silver or gold quality parsnips, cauliflower, potatoes, and kale. Starting these crops early gives you multiple harvest chances to achieve the needed quality.
Pierre's General Store sells tulip bulbs and cauliflower seeds on Spring 13. This provides a perfect opportunity for replanting and ensuring you have enough crops for both profit and bundles.
Summer: Building Wealth
Summer crops should prioritize blueberries for their highest profit per day ratio. You can also plant corn, tomatoes, and hot peppers to diversify your farm's output.
Saving money during summer is crucial. You'll need substantial funds for fall crops like cranberries and pumpkins, which are essential for Community Center bundles and continued profitability.
Fall: Harvesting Profits and Community Center Progress
Fall crops should prioritize:
- Cranberries: Highest profit per day during this season
- Pumpkins: Required for the Community Center
- Beets: Another solid planting option
Additionally, you should save enough money to purchase strawberry seeds for Year 2 spring planting, as these offer excellent returns.
Winter: Mining, Fishing, and Foraging
Winter crops cannot be grown on the main farm during this season. However, you can plant winter seeds in the greenhouse if you've unlocked it.
This season is ideal for focusing on mining, fishing, and foraging activities. These activities generate income, provide resources for tool upgrades, and help complete various Community Center bundles.
Essential Skill Development
Your skill development in Year 1 should focus on reaching level 5 in Farming and Mining by winter. These skill milestones unlock powerful professions that shape your long-term strategy.
Artisan profession: This Farming level 5 option makes artisan goods worth 40% more. Geologist/Miner profession: These Mining level 5 options either give extra gems or ore when mining.
Community Center Bundle Strategy
Community Center completion should be a primary focus in the first year. It unlocks powerful rewards including the Crystalarium, Seed Maker, and Auto-Grabber.
The Community Center contains multiple bundle categories you'll need to complete:
- Spring/Summer/Fall/Winter Foraging Bundles (50 items each)
- Quality Crops Bundle (5 parsnips, cauliflower, potatoes, and kale with silver or gold quality)
- Animal Bundle (5 of each milk, wool, and egg products)
- Fish Bundle (10 specific fish)
- Artisan Bundle (6 artisan goods)
- Kitchen Bundle (5 cooked dishes)
Advanced Farming and Optimization Strategies
Advanced farm management requires strategic planning, crop optimization, and leveraging automation systems to significantly increase farm efficiency and profit.
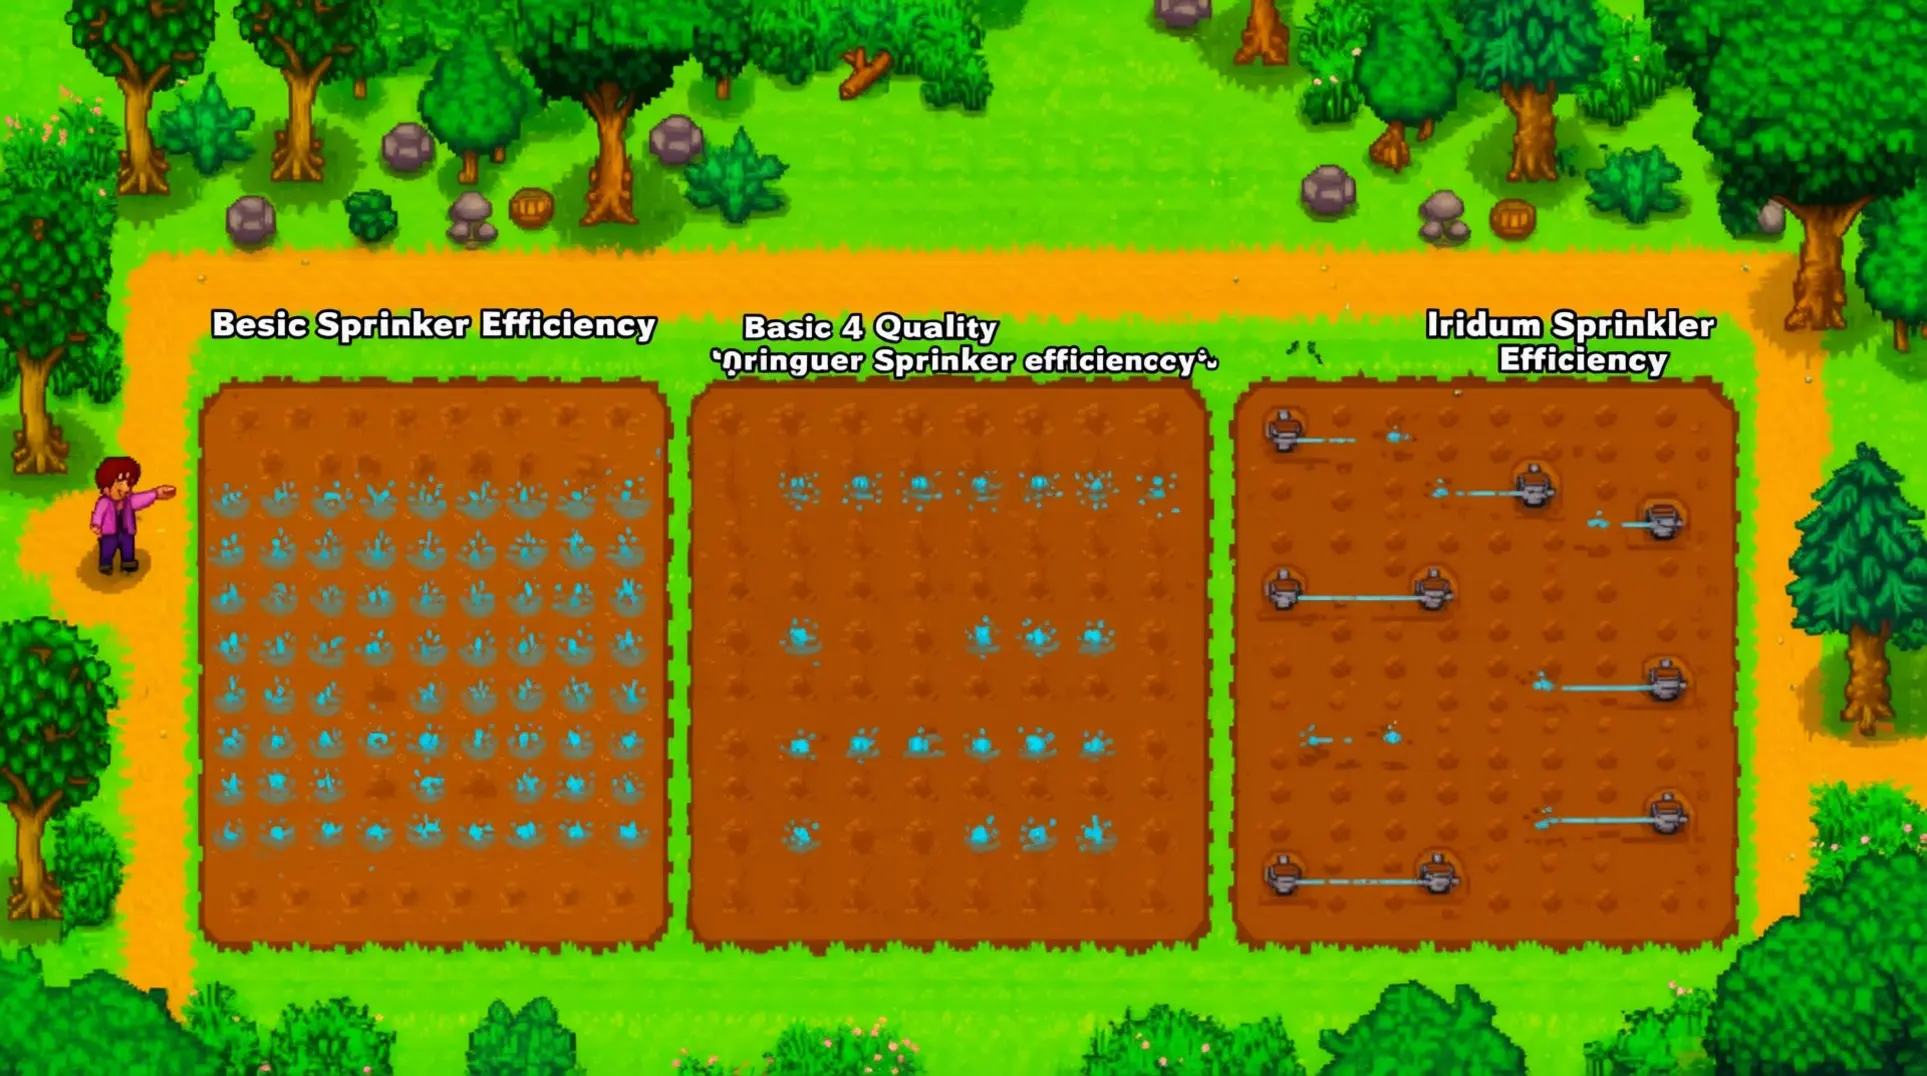
Sprinkler Systems and Strategic Layouts
Quality Sprinklers: Cover 8 adjacent tiles in a 3x3 pattern and represent the optimal choice for medium-scale farming operations. Iridium Sprinklers: Cover 24 tiles in a 5x5 pattern and are essential for large-scale automated farming.
The optimal Quality Sprinkler layout places sprinklers with exactly two tiles of space between them in a grid formation. This creates overlapping coverage that maximizes the number of watered tiles while maintaining walking space.
Iridium Sprinklers require strategic placement with 4 tiles of space between them. These patterns can cover up to 240 tiles with multiple sprinklers.
The most efficient sprinkler layouts must account for scarecrow placement. Scarecrow: Protects an 8-tile radius from crows, requiring careful planning to maximize both crop protection and sprinkler coverage.
Processing Equipment Comparison
Kegs vs Preserve Jars: Profit Analysis
| Equipment | Processing Time | Best For | Profit Multiplier |
|---|---|---|---|
| Kegs | 2-3 days | High-value fruits (Ancient Fruit, Starfruit) | 3x profit increase |
| Preserve Jars | 1-2 days | Lower-value fruits (Blueberries, Cranberries) | 2x profit increase |
Ancient Fruit: Processed through kegs produces wine worth 2310 gold (with Artisan profession). Selling raw ancient fruit yields only 825 gold, making keg processing 3x more profitable for high-value crops.
Preserve jars are more efficient for lower-value fruits like blueberries and cranberries (making jam). Kegs are optimal for high-value fruits like Ancient Fruit and Starfruit (making wine) for maximum profit per crop.
Integrated Automation for Peak Efficiency
Automated farming systems should combine sprinkler automation with crop processing through kegs and preserve jars. Processing multiplies profits significantly and frees up time for other profitable activities.
Greenhouse: Becomes a central component for year-round profitability when combined with high-value crops, automated watering, and strategic crop layouts.
Peak efficiency requires employing automation methods including:
- Sprinkler systems
- Animal coops and barns
- Processing equipment
Perfection Achievement Roadmap (100% Completion)
Unlocking the Perfection Tracker
The Perfection Tracker is located in Qi's Walnut Room on Ginger Island, represented by an Iridium Cat statue. It displays your current perfection value as an average score across multiple completion categories.
To unlock Qi's Walnut Room and access the Perfection Tracker, players must collect 100 Golden Walnuts out of the 130 total Golden Walnuts hidden across Ginger Island. This is your first major milestone on the path to 100% completion.
Perfection Tracker Categories
The Perfection Tracker monitors ten distinct categories, each contributing equally to your overall perfection percentage. These categories include:
- Achievements (49 base-game achievements plus platform-specific ones)
- Skills
- Crafting
- Cooking
- Shipping
- Friendship
- Money
- Bundles
- Golden Walnuts
- Other Collectibles
Perfection Value: This is calculated as an average score across all completion categories, updating as you make progress.
Reaching 100% Perfection triggers the game's ending and unlocks extra end-game content. This makes the tracker essential for planning your late-game activities.
Skill Mastery Requirements
The five core skills that must reach level 10 for Perfection are:
- Farming
- Mining
- Fishing
- Foraging
- Combat
Each skill contributes to the overall Perfection score, requiring balanced development across all areas.
Consistent daily activity in each skill area is necessary for efficient leveling. Focus on under-leveled skills to maintain even progression and avoid bottlenecks.
Shipping and Production Goals
For the Shipping category, players must ship at least one of every crop, animal product, fish, and artisan good in the game. This demands systematic collection and production planning across multiple seasons.
Early checklist creation helps track shipped items efficiently. Some items require specific farm buildings or seasonal conditions, making advance planning crucial.
Friendship and Social Completion
The Friendship category requires players to raise each villager's heart level to at least eight hearts. Marriage candidates need ten hearts, and you must view all of their heart events to complete this category.
Daily conversation and strategic gift-giving accelerate heart gain. Prioritize universally loved items to maximize friendship efficiency across the entire town.
Key Collection Milestones
Completing every bundle in the Community Center is a major component of the Perfection score. This long-term project requires resource management and seasonal planning.
The Other Collectibles category includes Monster Eradication (slaying each monster type), Museum donations (all artifacts and minerals), and special items and powers. The Golden Walnuts category requires finding all 130 Golden Walnuts hidden across Ginger Island through various activities.
Finding All 130 Golden Walnuts
The Golden Walnuts collection involves finding all 130 Golden Walnuts hidden across Ginger Island through various activities including completing puzzles, digging spots, NPC quests, and discovering hidden areas.
All 130 Golden Walnuts are required for the 100% Perfection achievement. This makes thorough exploration and completion of all activities on the island essential for completionists.
Ginger Island Exploration and Strategies
To repair Willy's boat and unlock Ginger Island access, players must gather:
- 200 Wood
- 5 Iron Bars
- 1 Hardwood
After gathering these materials, interact with the broken boat in the back room of Willy's Fish Shop. After repairing the boat, players must pay 1,000 gold to purchase a boat ticket from Willy, which includes the return trip to Ginger Island.
Ginger Island is located within the Fern Islands archipelago and is the only island in the archipelago that players can visit, featuring pirate and volcano-themed areas.
The island features multiple distinct areas:
- Beach: Landing area with Willy's boat
- Volcano: Northern area containing the Volcano Dungeon
- Jungle: Central area with Qi's Walnut Room and various NPCs
- Island Farm: Southern farming area with year-round growing potential
Each area contains unique resources, NPCs, and Golden Walnut locations.
Golden Walnuts Collection Strategy
Golden Walnuts: The primary collectible on Ginger Island, with 130 total walnuts hidden across the island through various activities.
Golden Walnuts can be found by:
- Completing puzzles
- Digging spots
- NPC quests
- Discovering hidden areas
Players must collect 100 Golden Walnuts to unlock access to Qi's Walnut Room and the Perfection Tracker.
All 130 Golden Walnuts are required for the 100% Perfection achievement. This makes thorough exploration and completion of all activities on the island essential for completionists.
Volcano Dungeon and Island Farm
Volcano Dungeon: A 10-story dungeon located inside the volcano at the north end of Ginger Island, accessed through a large cave on the south side of the volcano.
The Volcano Dungeon contains unique enemies like Magma Sparkers, Magma Duggies, and the Corrupted Colossus boss, requiring combat preparation. Players should come equipped with strong weapons and food before attempting this dangerous area.
Completing the Volcano Dungeon unlocks access to the Forge: a facility that allows players to upgrade tools using Cinder Shards and other rare materials found within the dungeon.
Volcano Dungeon rewards include rare materials like:
- Cinder Shards
- Magma Gems
- Dragon Tooth
These materials are essential for crafting powerful items and upgrading equipment.
Island Farm: A unique farming area on Ginger Island that allows year-round crop growth, including crops that normally die in winter on the main farm. This makes it ideal for continuous high-value crop production and enables crops to grow without seasonal restrictions.
The most profitable crops for year-round production include:
- Ancient fruit
- Starfruit
Pro Tips and Hidden Secrets
Transform Trash Into Profit
The trash can upgrade is a game-changing mechanic that increases the gold value of discarded items. This allows you to effectively 'sell' unwanted items for gold by throwing them away after upgrading.
Trash Can Upgrade: A progression system that converts discarded items into gold, turning waste into wealth while freeing inventory slots.
- Upgrade through copper, steel, gold, or iridium tiers
- Best for managing large quantities of low-value items like fiber, wood, and stone
- Particularly valuable for managing inventory space during farming and mining activities
Master the Power-Up Technique
The power-up feature enables automatic tool usage on multiple tiles when holding the tool button while moving. This dramatically increases farming and resource gathering efficiency.
Power-Up Feature: A technique where holding the tool button while moving allows automatic tool usage across multiple tiles or targets.
- Watering Can: Acts on multiple tiles simultaneously when upgraded
- Hoe: Tills multiple tiles in a row
- Axe: Chops multiple trees in succession
- Fishing: Cast multiple times
- Mining: Break multiple rocks
- Foraging: Gather multiple items
This technique works with all tools when moving with the tool equipped.
Optimize Your Gift-Giving Routes
Gift-giving efficiency can be maximized by giving each villager their preferred gifts twice per week. Loved gifts provide 80 friendship points compared to liked gifts providing only 45 points.
Weekly Gift Limit: The maximum number of gifts you can give to each villager per week to earn friendship points.
- Loved gifts on birthdays provide 200 friendship points instead of 80
- Give each villager preferred gifts twice per week (birthday + one additional day)
- Check each villager's schedule on the wiki to find preferred locations and times
- Create a systematic route through town each week, hitting all marriageable candidates and key NPCs in a single day
Tracking each villager's weekly gift limit allows you to maximize friendship progression efficiently without wasting time searching for them.
Now that we've covered the advanced strategies and hidden techniques, let's address the most frequently asked questions about achieving Perfection in Stardew Valley.
FAQ: Your Perfection Questions Answered
How long does it take to reach 100% Perfection?
Reaching 100% Perfection in Stardew Valley typically takes 250+ hours and multiple in-game years. Most players require 2-3 in-game years to complete all requirements.
Which crops are most profitable?
The best crop for profit depends on the season. Starfruit: The most profitable summer crop, selling for 750 gold each.
Ancient Fruit: The best year-round crop when processed into wine through kegs, yielding 2310 gold per fruit with the Artisan profession.
Fall crops like Cranberries are among the most profitable crops in their respective seasons, selling for 75 gold each.
How can I track my Perfection progress?
Perfection progress can be tracked in Qi's Walnut Room on Ginger Island after collecting 100 Golden Walnuts. The Perfection Tracker displays completion percentages across all categories.
Players can also track their Perfection progress through the Collections menu in-game. This menu shows completed achievements, shipped items, crafted recipes, and other completion metrics.
What are common beginner mistakes to avoid?
Common beginner mistakes include:
- Not prioritizing tool upgrades early
- Not planning for winter crops
- Not focusing on Community Center completion in the first year
- Not managing energy and time effectively
- Not building relationships with villagers early
- Not utilizing the Greenhouse for year-round farming
- Not saving money for expensive but essential purchases like sprinklers and processing equipment
- Not exploring and mining regularly
- Neglecting the importance of quality fertilizer and sprinklers
What are the most time-consuming aspects of Perfection?
The most time-consuming aspects of Perfection are typically the Friendship category and the Golden Walnuts collection. The Friendship category requires 8+ hearts with all villagers. The Golden Walnuts collection involves finding all 130.
How much money do I need for Perfection?
The Perfection achievement requires earning at least 10 million gold for the money category.
Conclusion
Your journey from novice farmer to Perfection achievement mirrors the dedication that made Stardew Valley a phenomenon with over 41 million copies sold. Created by solo developer Eric Barone, the game challenges you to systematically master every aspect of farm life.
The Ultimate Goal Awaits
Perfection Achievement: This ultimate goal demands 250+ hours and multiple in-game years of dedicated effort. Our comprehensive guide supports you throughout, covering everything from critical first-week strategies to advanced optimization techniques.
The path to 100% completion requires focused progression across multiple objectives:
- Master all six skills
- Ship every crop
- Craft every recipe
- Find all 130 Golden Walnuts
- Unlock Ginger Island
- Complete every Community Center bundle
Your Personal Journey
Systematic progression remains essential as you methodically work through all game aspects. The official Stardew Valley Wiki serves as your ultimate companion resource, helping you track progress and discover efficient pathways.
Each player's experience naturally varies based on personal playstyle preferences and preferred pace. Whether you emphasize strategic planning or simply enjoy the farming simulation experience, your journey to perfection will be uniquely yours.
Embrace the Process
Embrace the process rather than rushing toward the destination. Every season brings new opportunities, and the most rewarding farms reflect both careful planning and genuine enjoyment of each milestone.
More Stardew-Valley Guides
Stardew Valley Sprinkler Guide: Optimal Layouts & Efficiency
Master Stardew Valley sprinkler systems with our comprehensive guide covering optimal layouts, crafting recipes, and progression strategies for maximum farm efficiency.

Stardew Valley Sebastian Romance Guide: Gifts, Heart Events & Marriage
Discover how to romance Sebastian in Stardew Valley with our spoiler-free guide covering his favorite gifts, heart event triggers, and marriage requirements.
Ultimate Stardew Valley Farm Layout Designs Guide 2025
Discover expert Stardew Valley farm layout designs for maximum profit, aesthetic appeal, and efficiency. Learn optimal strategies for all farm types and advanced techniques.
AI Tactical Companion
Consult with our specialized tactical engine for Stardew-Valley to master the meta instantly.