Stardew Valley Sprinkler Guide: Optimal Layouts & Efficiency
Introduction
Mastering irrigation in Stardew Valley is crucial for building an efficient, automated farm that maximizes your productivity while minimizing daily chores. This comprehensive guide covers everything you need to know about sprinkler systems, from basic placement strategies to advanced optimization techniques that will transform your farming experience.
Whether you're just starting your farming journey or looking to optimize late-game operations, understanding sprinkler mechanics and optimal layouts will save you countless hours and significantly increase your farm's output potential.
Understanding Sprinkler Types
The foundation of efficient irrigation lies in understanding the three distinct sprinkler tiers available in Stardew Valley. Each type offers unique coverage patterns and strategic advantages that evolve with your farming progression.
Basic Sprinkler
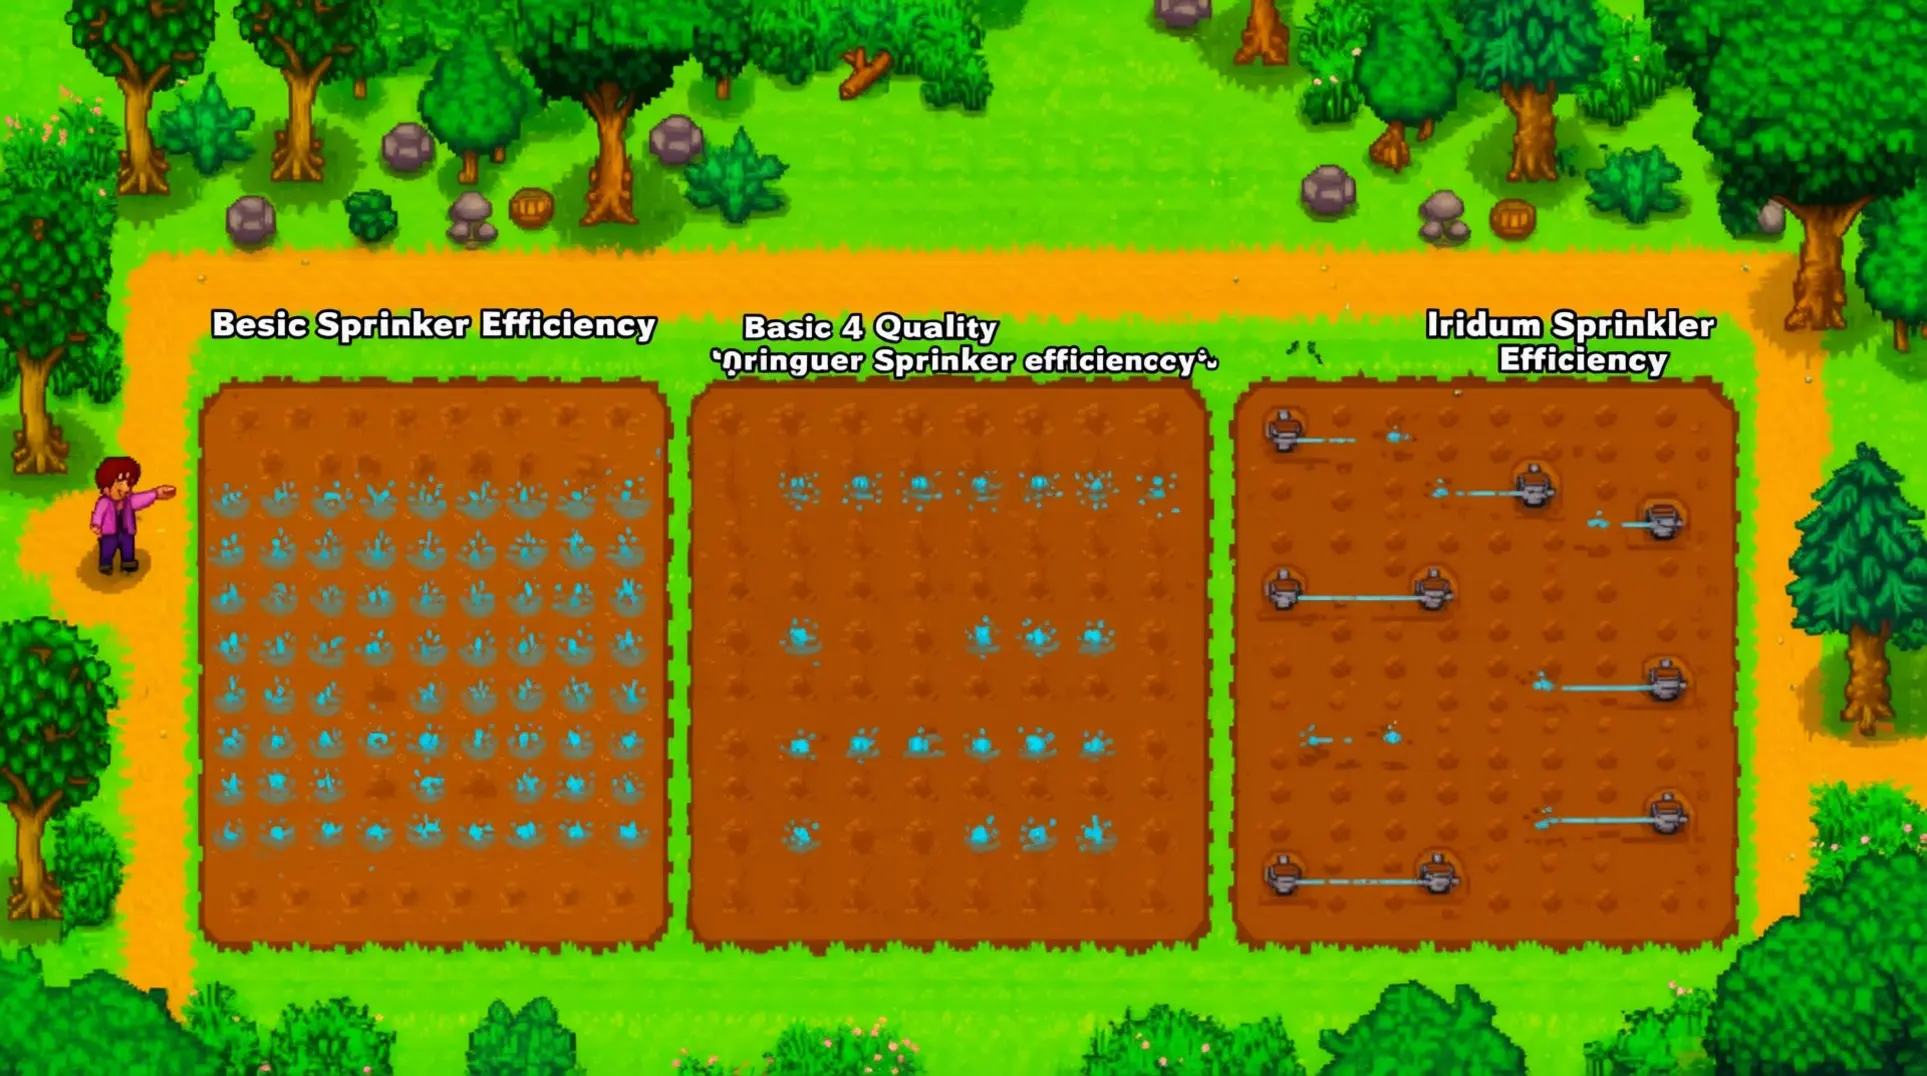
The Basic Sprinkler serves as your entry point into automated watering, unlocked at Farming Level 2. This essential tool waters exactly four tiles positioned directly adjacent to it (up, down, left, right). While limited in scope, it represents a crucial first step in reducing daily watering responsibilities.
The Basic Sprinkler's coverage pattern requires a checkerboard placement strategy to avoid gaps in irrigation. This means placing sprinklers diagonally rather than side-by-side, ensuring that each sprinkler covers different areas without overlap.
Quality Sprinkler
Unlocked at Farming Level 6, the Quality Sprinkler marks a significant upgrade in coverage efficiency. This mid-tier sprinkler waters eight surrounding tiles in a complete 3x3 area, excluding the center tile where the sprinkler itself sits.
The Quality Sprinkler's grid-based placement allows for direct adjacency between units, creating seamless coverage across large areas. This efficiency makes it the backbone of most farms throughout Year 1, providing an excellent balance of coverage and resource investment.
Iridium Sprinkler
The pinnacle of irrigation technology, the Iridium Sprinkler becomes available at Farming Level 9. This advanced unit waters an impressive 5x5 grid, hydrating 24 tiles surrounding the center placement.
Recent game updates, including version 1.5, have improved quality of life by preventing hoes from accidentally picking up sprinklers during soil re-tilling. This enhancement allows for more flexible layout adjustments without disrupting existing irrigation systems.
Optimal Layout Patterns
Achieving maximum farming efficiency requires adapting your sprinkler strategy to each tier's unique characteristics. The optimal approach evolves dramatically as you progress through different game phases.
Early Game Strategy
During the early game phase, your first Basic Sprinklers should be placed diagonally rather than side-by-side. This checkerboard arrangement ensures comprehensive coverage of spaces that adjacent sprinklers cannot reach.
Focus on placing these initial sprinklers around your most valuable crops first, typically high-profit items like cauliflower, potatoes, and kale. The diagonal pattern maximizes the limited coverage area while establishing a foundation for future expansion.
Mid Game Strategy
The optimal pattern for Quality Sprinklers transitions to a grid-based layout where sprinklers are placed directly next to each other. This method, as detailed by GameSpot, efficiently waters large areas without gaps.
This grid approach allows for easy expansion and maintenance, making it ideal for scaling your operations during the mid-game. The 3x3 coverage pattern means each sprinkler supports its neighbors, creating a cohesive irrigation network.
Late Game Strategy
The most effective pattern for Iridium Sprinklers involves creating separate 5x5 squares with the sprinkler centered in each. Leave a one-tile space between these squares for scarecrow placement, ensuring crop protection without compromising irrigation coverage.
This community-vetted approach, discussed on Reddit, represents the ultimate fusion of coverage and resource management. By duplicating this pattern across your farm, you can achieve remarkable land use efficiency of up to 92%.
Crafting and Resource Management
Mastering the three-tiered sprinkler system requires strategic planning and material investment. Each upgrade represents a significant leap in automation capabilities and farming efficiency.
Basic Sprinkler Recipe
Unlocked at Farming Level 2, the Basic Sprinkler requires one Copper Bar and one Iron Bar. This relatively simple recipe makes it accessible early in the game, providing immediate relief from manual watering duties.
The Basic Sprinkler crafts quickly and provides immediate value, making it an essential early investment for any serious farming operation.
Quality Sprinkler Recipe
The Quality Sprinkler, unlocked at Farming Level 6, demands more sophisticated materials: one Iron Bar, one Gold Bar, and one Refined Quartz. If these materials are scarce, check the Traveling Cart on Fridays and Sundays for potential deals.
This investment pays dividends through increased coverage and reduced maintenance time, making it the workhorse of mid-game farming operations.
Iridium Sprinkler Recipe
The Iridium Sprinkler recipe, available at Farming Level 9, requires a Gold Bar, a Battery Pack, and an Iridium Bar. For players preferring to purchase rather than craft, Krobus in the Sewers sells these sprinklers every Friday for 10,000g.
The strategic benefit is immense time savings and superior land efficiency. While the Basic waters 4 tiles, the Iridium waters 24—a six-fold improvement that transforms your daily farming routine.
Advanced Optimization Techniques
For large-scale operations and late-game farming, advanced sprinkler strategies maximize efficiency while maintaining crop protection and accessibility.
Large-Scale Operations
For players targeting massive agricultural operations, accumulating 30 or more Iridium Sprinklers by Year 2 enables building a fully automated farming empire. Advanced layouts often combine Iridium with Quality Sprinklers, creating massive cross patterns for maximum coverage.
The key to large-scale success lies in balancing sprinkler density with accessibility. Leave adequate walking paths between sprinkler clusters to ensure you can harvest crops efficiently without excessive backtracking.
Greenhouse Optimization
The greenhouse contains 120 plantable plots that can be configured in several powerful ways. The most comprehensive setup uses six Iridium Sprinklers for near-total coverage, with strategic placement ensuring every corner receives adequate hydration.
A balanced hybrid approach employs four Iridium and six Quality Sprinklers, creating a more cost-effective solution while maintaining excellent coverage. This hybrid method reduces resource investment while still providing comprehensive irrigation.
Scarecrow Placement Strategy
Strategic scarecrow placement becomes non-negotiable when operating vast fields. A standard scarecrow protects crops within an 8-tile circular radius. For optimal coverage without gaps, space them 14-16 tiles apart.
The 6×6 box layout pattern represents a highly efficient method to maximize protective range while minimizing resource investment. This spacing ensures complete crop protection while maintaining easy access for maintenance and harvesting.
Sprinkler Progression
Understanding the natural progression of sprinkler technology helps prioritize farming level development and resource allocation for maximum efficiency gains.
Early Game Milestones
Your first major milestone is the Basic Sprinkler at Farming Level 2. While its coverage is limited to four tiles, it provides crucial first steps in reducing daily watering chores. Focus on high-experience crops like cauliflower and potatoes to reach this milestone quickly.
The Basic Sprinkler teaches fundamental placement concepts that will serve you well throughout your farming career, making it an essential learning experience.
Mid Game Transition
The true game-changer arrives at Farming Level 6: the Quality Sprinkler. This workhorse becomes the backbone of your farm for the entirety of Year 1, providing excellent coverage without excessive resource investment.
By focusing on high-experience crops like potatoes and kale in Spring, you can realistically achieve Farming Level 6 before the season ends, setting up optimal mid-game operations.
End Game Goals
Your ultimate goal is the coveted Iridium Sprinkler, unlocked at Farming Level 9. Acquiring it becomes a primary focus in Year 2, requiring dedicated trips to the Skull Cavern for iridium ore.
Transitioning to a grid of Iridium Sprinklers represents the final step in achieving complete farming automation, freeing up time for other profitable activities like mining, fishing, and relationship building.
Conclusion
Implementing the right sprinkler strategy transforms Stardew Valley from a daily chore into an automated paradise. Start small with Basic Sprinklers, scale efficiently with Quality models, and eventually dominate with Iridium coverage. Each tier represents not just better watering, but more time for other activities.
Remember that optimal layouts consider both coverage and scarecrow protection. Your crops' safety is as important as their hydration. With these strategies, your farm will flourish while you enjoy the freedom to explore everything Pelican Town offers.
For advanced players, consider how these sprinkler strategies integrate with other farm optimization techniques, including greenhouse setup and large-scale operations to create the ultimate automated farming experience.
More Stardew-Valley Guides
Stardew Valley Complete Guide: From Beginner to Perfection
Master Stardew Valley with our comprehensive wiki guide. Learn farming strategies, achieve 100% Perfection, and unlock all secrets.

Stardew Valley Sebastian Romance Guide: Gifts, Heart Events & Marriage
Discover how to romance Sebastian in Stardew Valley with our spoiler-free guide covering his favorite gifts, heart event triggers, and marriage requirements.
Ultimate Stardew Valley Farm Layout Designs Guide 2025
Discover expert Stardew Valley farm layout designs for maximum profit, aesthetic appeal, and efficiency. Learn optimal strategies for all farm types and advanced techniques.
AI Tactical Companion
Consult with our specialized tactical engine for Stardew-Valley to master the meta instantly.