The Complete Guide to Museum Completion in Animal Crossing: New Horizons
Introduction
Building a complete museum in Animal Crossing: New Horizons is a monumental task, spanning 316 donations across bugs, fish, fossils, sea creatures, and art. This guide breaks down every step, from unlocking the museum and its wings to mastering the strategies for finding every last critter and masterpiece. You'll learn exactly what to hunt, where to find it, and how to optimize your efforts to finally earn those completion rewards.
Museum Basics: Unlocking & Upgrading Your Collection Hub
Initial Unlock: From Tent to Museum Building
Your museum journey starts with Tom Nook being surprisingly excited about bugs. First, you'll need to donate five fish or insects to him at Resident Services, which feels a bit weird since he's not exactly a nature guy, but hey. Once you hit that number, he'll call his old pal Blathers, and that owl will show up in a tent the very next day.
This tent isn't just decorative - it functions as your provisional museum while the real deal gets sorted. You can't just sit around though; you'll need to pick out the perfect spot for the permanent structure using your island designer tools, and during this phase you'll also learn the shovel recipe so you can really start digging into island development.
After placing the site, you've got one day of waiting. Construction wraps up overnight, and you'll have a proper museum building ready for visitors. But hold up - you're not done donating yet. Blathers needs fifteen total items before the museum can have its grand opening, so you've got ten more fish or bugs to catch after that initial five.
Art Wing Unlock Requirements
The art wing used to be unlocked by donating the first genuine piece of art to Blathers, which triggered a one-day construction period. However, Update 2.0 completely changed the system when it dropped on November 4, 2021, making the art wing automatically unlock once the museum is built.
Now you can get Redd through Harv's Island Plaza instead of waiting for random visits. First, you need to fund his co-op shop with bells at the plaza, and once you do, he'll set up permanently alongside vendors like Kicks, Leaf, and Katrina. No more guessing when that sketchy fox will show up - he's there daily, selling both authentic and forged artwork. Plus, he runs a raffle where 500 bells gets you one of thirty unique handheld items.
Brewster's Café: The Roost Unlock
Getting Brewster and his café takes some legwork, but that pigeon milk coffee is worth it. First, your island needs a 3-star rating and your museum must be fully upgraded with all three wings - you'll also need at least one donation from each of the five museum categories: fish, bugs, fossils, sea creatures, and art. Once you check all those boxes, you'll find Blathers in the main museum room doing his thinking pose (keep an eye out for that subtle exclamation mark). He'll ask you to track down his old friend Brewster.
This is where Kapp'n comes in handy. Pay him 1,000 Nook Miles for a boat tour to a mystery island, and you'll spot Brewster hanging out near his own small café setup among the trees. Chat him up, and he'll agree to open The Roost as a museum extension. Construction starts the day after you recruit him, and the café opens on day three - just like that, you've got coffee and a cozy new hangout spot.
Animal Crossing: New Horizons Donation Checklist: All 316 Museum Items
So you're trying to complete Blathers' museum in Animal Crossing: New Horizons? You've got your work cut out for you. The full collection spans 316 items across five categories, and we're going to break down exactly what you're hunting for.
Bug Collection: 80 Insect Species
The bug collection in New Horizons clocks in at 80 total species, which is eight more than New Leaf gave us. That boost means you'll be hunting down fresh additions like the Atlas moth, blue weevil beetle, and paper kite butterfly, but unfortunately, some old-timers got the boot - the fruit beetle, petaltail dragonfly, and house centipede won't be showing up.
Catching everything means paying attention to both the calendar and the clock, since bugs operate on strict seasonal and time-of-day schedules. If you're looking to fund your island projects, the giraffe stag, golden stag, and horned hercules are your golden tickets, each selling for 12,000 Bells a pop.
Fish Collection: 80 Aquatic Species
Fish keep pace with bugs at 80 total species, which is another eight-species jump from New Leaf. That expansion brings in fresh catches like the anchovy, barreleye, golden trout, and snapping turtle, but you'll notice a few familiar faces missing - the barbel steed, eel, and rainbow trout got cut.
The fishing mechanics still revolve around shadow sizes, which means you'll need to squint at the water and guess what you're reeling in. And here's a key tip: some rare fish only spawn at river mouths, where the river meets the ocean, so you'll want to check those spots daily.
Fossil Collection: 73 Prehistoric Finds
The fossil hunt got bigger with 73 total pieces to discover, which is six more than New Leaf offered. The breakdown is pretty specific: you'll find 35 multi-part fossils that assemble into 21 complete skeletons, plus 14 standalone pieces that don't need assembly.
Digging them up is straightforward - just look for the crack marks on your island each day. The catch is that only a few fossils spawn daily, which means you're in for a months-long grind if you want every single piece. And don't forget: Blathers has to assess each fossil before you can donate it, so that'll become part of your morning routine.
Sea Creatures: 40 Deep-Sea Specimens
Sea creatures arrived in the July 2020 free update, bumping the total to 40 specimens - ten more than New Leaf ever had. You'll need to snag a wet suit from Nook's Cranny first, then hit the ocean and scan for bubbles breaking the surface.
Just like fishing, the shadow size gives you a clue about what you're chasing, though underwater you'll be diving instead of casting. If you're having trouble finding specific creatures, Harv's Island now has a permanent shop that occasionally stocks what you need.
Art Collection: 43 Masterpieces (30 Paintings, 13 Statues)
Redd's shady art dealing brings 43 total pieces to collect, split between 30 paintings and 13 statues. The catch is that most of his inventory is fake - you'll need to spot the differences between genuine masterpieces and clever forgeries.
Redd sets up shop on his Treasure Trawler boat or permanently on Harv's Island, and while some pieces like the Mona Lisa are always authentic, most have specific fake variants. Once you donate your first real artwork, Blathers closes the museum for a day to build the art gallery wing.
Overview: Rewards for Completing All 316 Donations
The full museum collection is a beast: 316 total items split across five categories - 80 bugs, 80 fish, 73 fossils, 40 sea creatures, and 43 art pieces. If you manage to donate everything, Update 2.0 rewards you with a special museum poster you can hang in your house as a permanent trophy.
Fossil Identification & Assessment System
Finding & Digging Up Fossils
Every morning when you boot up your island, you'll find 4-6 new star-shaped cracks scattered across the ground, which means it's time to grab your shovel. These fossils can pop up pretty much anywhere you can dig - grassy fields, dirt paths, and even beach sand - so you'll want to check every corner. But here's the catch: your island can only hold six unexcavated fossils at any given time, so if you're slacking on your daily digs, you're literally leaving Bells buried in the ground.
Blathers' Assessment Process
Once you've filled your pockets with mystery chunks, haul them straight to Blathers at the museum, because never sell fossils unassessed. An unassessed fossil is worth 2,500 Bells to Blathers, but after Blathers takes a look, that same piece could be worth thousands. The good news is he can assess multiple fossils in one go, so you don't have to sit through his dialogue a dozen times. And if you choose to donate an assessed fossil, he'll even give you a little presentation about the prehistoric creature it came from - which is honestly half the fun.
Completing Dinosaur Skeletons
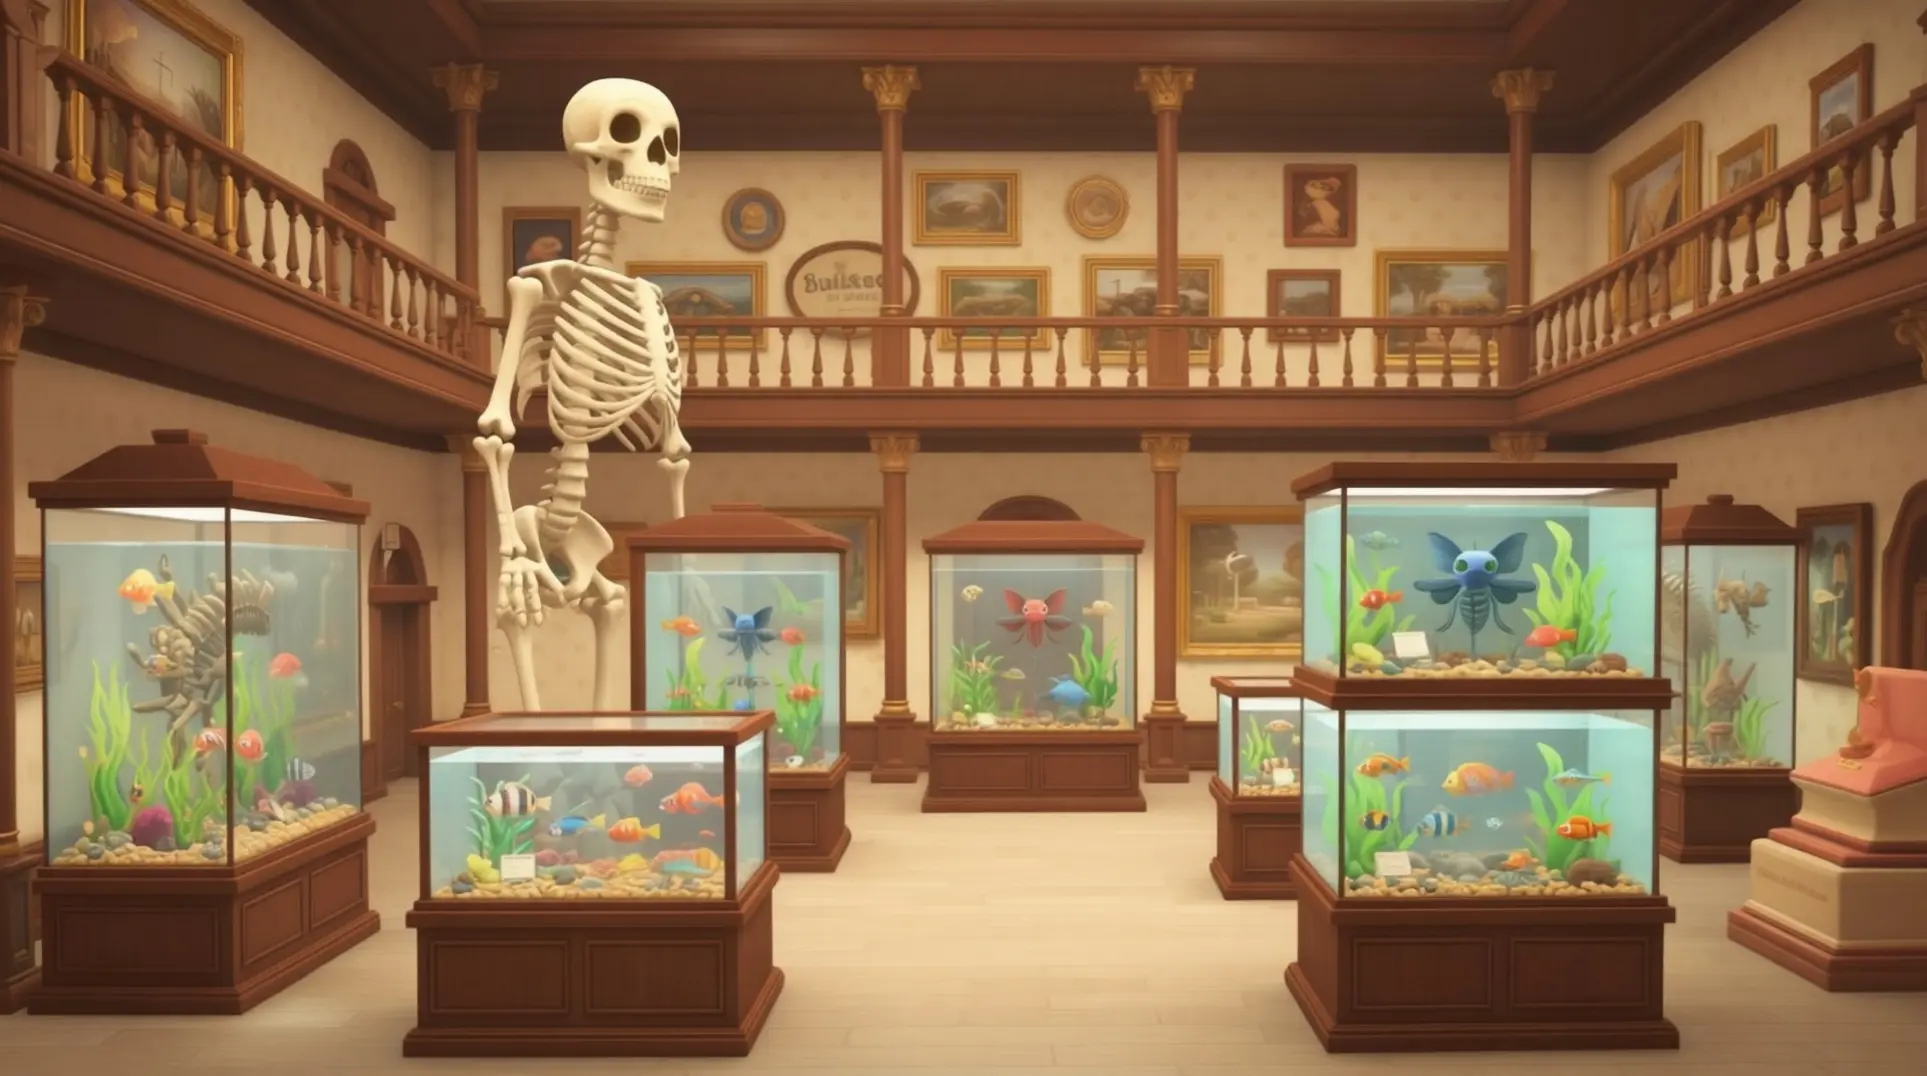
Out of the 73 total fossils in New Horizons, 35 of them belong to multi-part sets that form complete dinosaur skeletons. These combine into 21 different species, and when you finally get every piece - like the T. Rex skull, tail, and torso - something special happens. Donate all parts of a set and Blathers automatically arranges them into a full, articulated skeleton on an elevated platform, which looks way cooler than just throwing random bones in a pile. Other complete sets include the Triceratops and the towering Brachiosaurus, which needs a skull, tail, chest, and pelvis to complete the look.
Redd's Treasure Trawler & Harv's Island
Redd's Treasure Trawler parks at that secret northern beach on your island - the little cove most people forget exists. You'll spot it by the green and brown striped awning with Redd's logo on the flag, and it shows up randomly when Redd feels like visiting. When he does roll in, you'll find four pieces of art for sale on his boat, which means more options but you'll need to hunt him down first.
Now, if you've set up Redd's shop over at Harv's Island, that's a completely different story. Harv's location only stocks two pieces at a time, so you've got fewer choices but it's way more convenient since you're probably already there for photo shoots anyway. The stock refreshes periodically whether you're time traveling or playing straight, which means you can't just spam the system - you're stuck waiting for Redd's schedule either way.
Common Forgery Tells & Examples
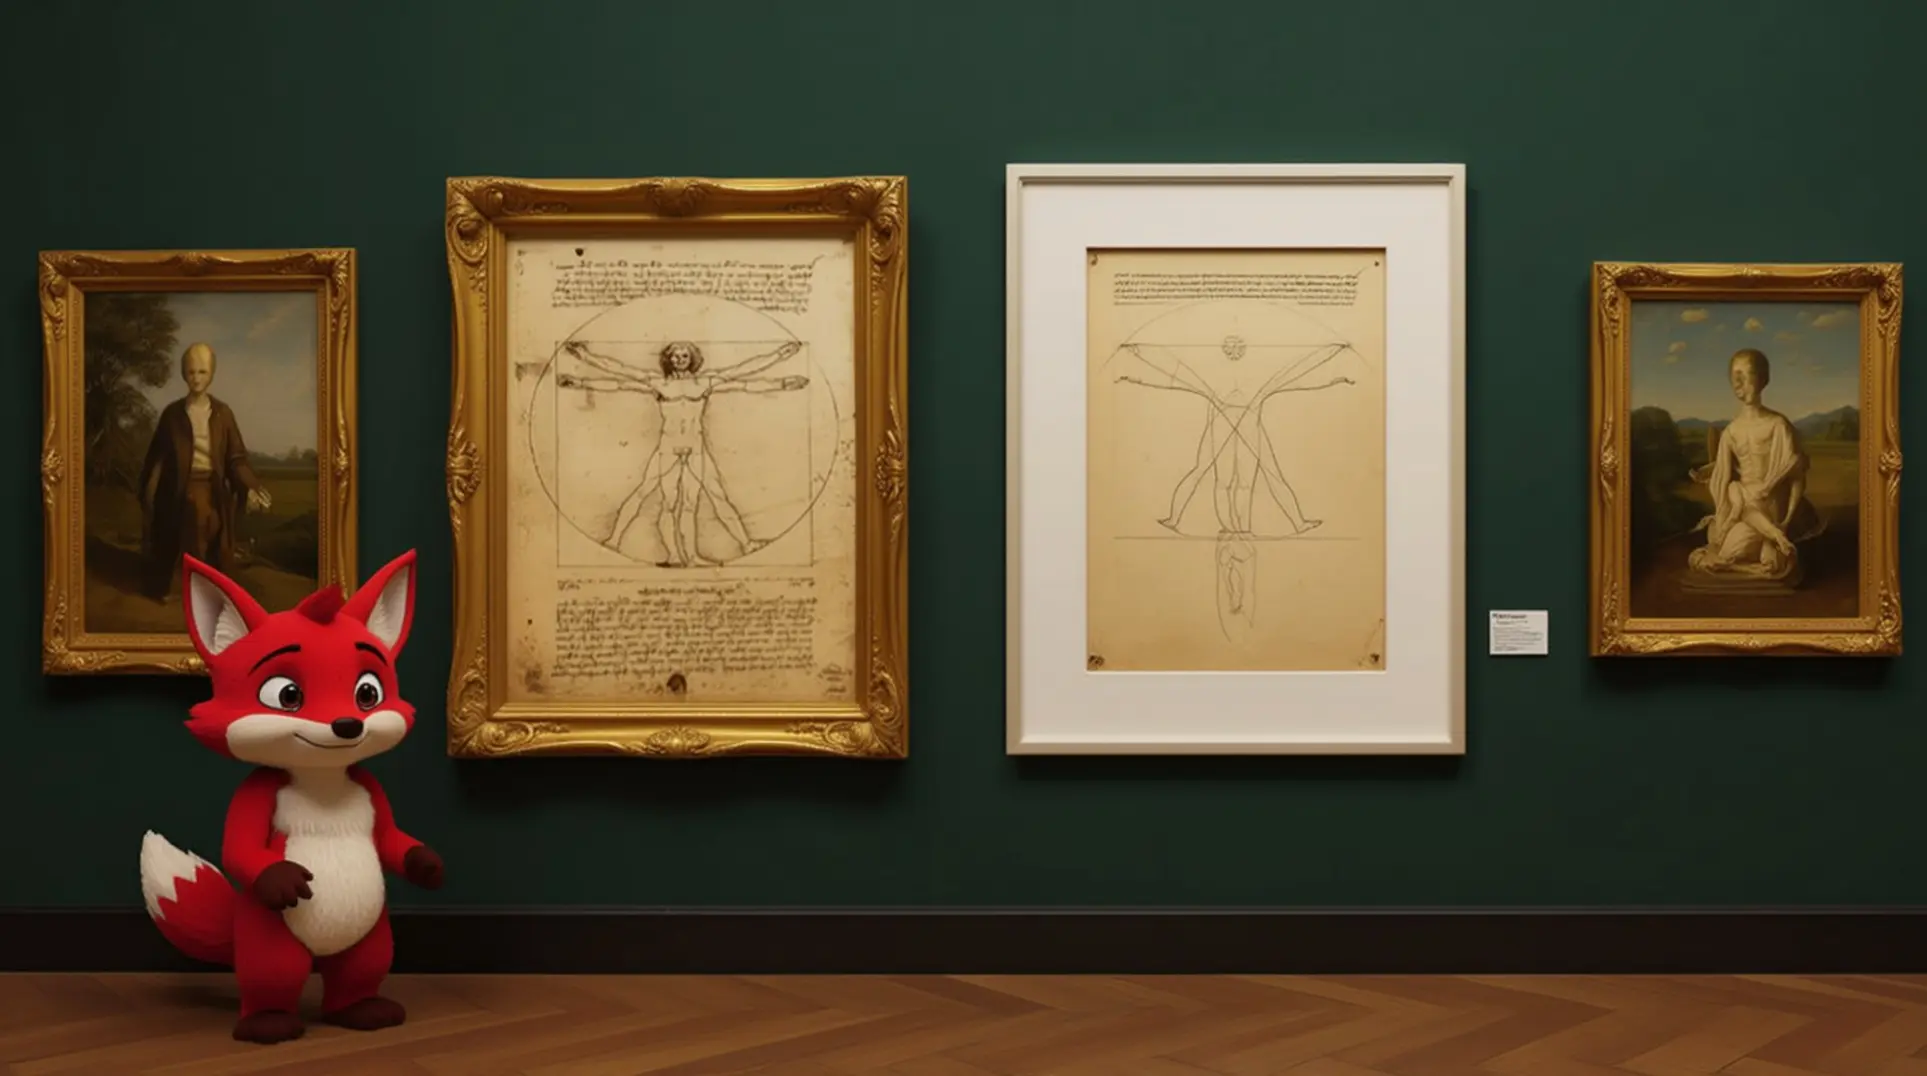
Here's where things get fun, because some of Redd's fakes are embarrassingly obvious while others will make you squint at your screen for five minutes. Take the Academic Painting based on the Vitruvian Man - the real deal is perfectly clean, but the forgery has an ugly coffee mug stain hanging out in the top-right corner. It's the kind of detail you won't notice unless you're zoomed in, which you absolutely should be doing for every single piece.
The Amazing Painting and Detailed Painting are trickier since their tells are more subtle. For the Amazing Painting, you're looking for a missing hat on one of the figures in the crowd, while the Detailed Painting sneaks in purple hydrangeas instead of blue ones. The secret is having a reference image handy on your phone, because nobody expects you to memorize every Renaissance masterpiece. Just don't feel guilty about cheating a little - Redd's the one trying to scam you, after all.
Always-Genuine Art Pieces
If all this detective work sounds exhausting, here's the good news: some paintings are always the real deal, no magnifying glass needed. These are your stress-free purchases, the ones you can grab without a second thought.
- Calm Painting (Lady with an Ermine)
- Common Painting (The Gleaners)
- Dynamic Painting (The Great Wave off Kanagawa)
- Flowery Painting (Sunflowers)
- Glowing Painting (The Fighting Temeraire)
- Moody Painting
- Nice Painting
- Proper Painting
- Sinking Painting
- Warm Painting
- Worthy Painting
The Dynamic Painting is a weird case because it actually had a fake version back in New Leaf, so veteran players might get paranoid. But in New Horizons, it's permanently genuine, which means you can buy it with confidence every single time.
Advanced Museum Completion Strategies
Seasonal Planning & Critterpedia Management
The Critterpedia app on your NookPhone is your best friend here - it automatically registers every bug, fish, and sea creature the moment you catch it, sorting everything into neat categories without any extra work from you. But here's where it gets tricky: creature availability depends entirely on the current in-game month, season, and time of day, which means you're working with a constantly rotating roster that never sits still.
If you're in the Northern Hemisphere, you're experiencing the exact opposite seasons of your Southern Hemisphere friends, so those monthly checklists you see online need careful reading. You'll want to prioritize creatures that are about to leave at the end of each month since those represent your most urgent targets - miss them and you're waiting a full year for another shot. While you're scrambling for the departing critters, don't ignore the newly arrived species; these will stick around longer, giving you breathing room to catch them later.
Time-of-day planning is absolutely crucial because some bugs and fish only appear during brutal windows like 3 AM to 8 AM or 9 AM to 4 PM. Don't try to memorize all these spawn times; instead, use interactive online Critterpedias with checkboxes that track your progress while displaying rarity, sell prices, and exact locations. These tools turn a nightmare of spreadsheets into something you can actually manage during your morning coffee.
Fossil Completion & Duplicate Management
New Horizons contains 73 total fossils, and they break down into 59 multi-part pieces that form 21 complete skeletons plus 14 standalone specimens you can find on their own. Every single day, 4-6 new fossils will spawn as X-shaped cracks across your island, which means you need to do a thorough daily sweep with your shovel if you're serious about completion.
After you've dug up your haul, you'll need to visit Blathers for assessment, and this is where your strategy splits in two. Any fossil you haven't donated gets sent straight to the museum, but duplicates are inevitable - and they're not useless. You should sell these extras at Nook's Cranny for 1,000 to 6,000 Bells each, with larger specimens like the T-Rex skull commanding the highest prices.
If you're chasing the satisfaction of assembling complete skeletons before selling, consider storing multiple duplicates of high-value fossil parts until you've collected every piece of a set. You can temporarily display the full skeleton for that sweet completion screenshot, then break it down for profit once you've enjoyed your handiwork.
Art Collection & Redd Visit Optimization
Redd operates through two completely different systems, and you'll need to master both if you want to fill that art gallery fast. The first is his random Treasure Trawler visits to your island's secret beach, which Isabelle announces in her morning briefing and marks with a boat icon on your map. These are unpredictable and only happen every couple of weeks, so they're unreliable for steady progress.
The real game-changer is the permanent shop Redd sets up on Harv's Island after you receive Harv's letter and fund his stall with 100,000 Bells. Once unlocked, this shop is always available, giving you a guaranteed daily shot at new art. Every piece Redd sells could be a forgery, though, so you'll need to inspect each one for visual discrepancies like incorrect proportions or altered colors before you waste your Bells on fake artwork.
Harv's Island Redd also runs a daily raffle with equippable items, but you can only participate once per day. Friends can visit your Harv's Island via the airport to access shops you've funded, which means you could theoretically coordinate with other players to check multiple Redd inventories - though each person still faces their own purchase limits.
Museum Stamp Rally & Special Events
Every year from May 18 to May 31, your museum celebrates International Museum Day with a Stamp Rally event that runs across all four galleries. You'll know it's live when Isabelle mentions it in her morning announcement, and starting is as simple as speaking with Blathers at the museum entrance.
Each gallery - bugs, fish, fossils, and art - contains three stamp stations you'll need to locate, and these stations shuffle positions every single day throughout the two-week event. This means you can't just memorize locations; you'll be hunting fresh each time you participate. Completing a gallery's stamp collection grants exclusive rewards, including golden plaques you can display, so it's worth running through all four sections even after you've finished your main museum collection. The event was added in Version 2.0 and repeats annually, giving you a nice mid-spring activity when your critter hunting might be in a lull.
Switch 2 Edition & Version 3.0 Museum Features
Version 3.0 Update Overview
Version 3.0 hit on January 14, 2026, and it's a solid chunk of new stuff. The main attraction is Kapp'n's Family Hotel, which plants itself right on your island's pier, but there's also Slumber Island - a weird, mysterious spot you can explore for resources. The update crams in over 100 new items too, including some seriously cool crossovers from The Legend of Zelda and retro gaming franchises. And yeah, they finally fixed some of the crafting tedium with QoL improvements that streamline all that repetitive button-mashing.
Museum-Specific Changes (If Any)
Bad news for museum fans: Version 3.0 didn't add a single thing to the museum. No new exhibits, no facility upgrades, nothing. The patch notes are completely silent on it. You're still working with everything from the 2.0 update - that means the automatic art wing and The Roost café are still the latest features.
Indirect Museum Benefits from 3.0
Even though the museum got ignored, the general QoL improvements in 3.0 accidentally make it way easier to fill out your collection:
- Home Storage Boost: You can stash way more materials, making it easier to hoard donations for Blathers.
- Crafting Overhaul: Less time spamming A to craft tools means more time catching bugs and fish for the museum.
Museum Rewards & Completion Benefits
Individual Wing Completion
Let's be real - completing a single wing won't shower you with bells or rare items. The museum's four wings (bugs, fish, fossils, and art) each offer a different kind of payoff, and that's the quiet satisfaction of seeing those empty exhibits fill up over time. The bug room pulls you in with habitats that actually look like where you'd find these critters in the wild, while the fish wing goes all-out with glass tunnels that make you feel like you're walking through the ocean. Fossils show up in chronological order, so you can literally see the history of your island's prehistoric life take shape as you donate more. And the art wing? That's where your detective skills get tested, since you'll need to spot Redd's forgeries among the real masterpieces. While Blathers will happily talk your ear off with facts about each donation, you won't get a trophy - but you will get something better: a museum that feels like yours.
100% Museum Completion Reward
Now, if you're the type who needs a physical reward for your pain, the 2.0 update finally delivers. Once you've donated all 316 items across every single category, Blathers will hand you a framed poster for each completed wing. These aren't just cheap prints - you can hang them on your walls as proof of your insane dedication, and you get one free poster per wing. If you want duplicates to scatter around your island, you can buy more from Blathers directly with bells. Here's the catch: the art wing will be your biggest headache, since you'll need to collect all 43 genuine pieces from Redd's scam-filled Treasure Trawler. Completing the full museum is probably one of the longest-term goals in New Horizons, but at least you'll have something to show for it besides bragging rights.
The Roost Café Benefits
The Roost isn't just a place to burn bells on overpriced coffee - though at 200 Bells a cup, you might feel that way at first. Brewster runs the café inside the museum, and he'll serve you a maximum of two cups per day, which means you'll need to keep coming back. What you're really paying for is the social scene, since villagers randomly drop in and they'll chat with you in ways they never do on the main island. Sometimes special characters show up too, so you should check daily just in case someone interesting is grabbing a latte. Stick with it for consecutive visits and Brewster will start handing out Brewstoids, which are a weirdly satisfying collection of coffee-themed rewards you can't get anywhere else. The Roost transforms the museum from a static exhibit hall into an actual community hub, giving you a peaceful spot to escape your island management chores.
Conclusion
Completing Blathers' museum is a long-term journey that transforms your island's cultural hub from an empty hall into a vibrant, personal showcase. By strategically managing your Critterpedia, fossil digs, and Redd's art deals, you can systematically fill every exhibit. The final reward - a set of commemorative posters - is a fitting trophy for one of the game's most satisfying accomplishments.
More animal-crossing-new-horizons-switch-2-edition Guides
Mastering Redd's Art Deals in Animal Crossing: A Complete Guide to Genuine Pieces and Fake Detection
Learn how to identify Redd's forgeries and secure genuine art for your museum in Animal Crossing. Includes cheat sheets, strategies, and tips for completion.
The Complete Terraforming Guide for Animal Crossing: New Horizons: Tools, Tips, and Switch 2 Rumors
Learn how to master terraforming in ACNH. This guide covers core tools, advanced techniques, and rumored Switch 2 enhancements to build your dream island efficiently. Save time and Bells!
The Ultimate Guide to Transferring Your Animal Crossing: New Horizons Island to Switch 2
Step-by-step instructions to migrate your ACNH island, DLC, and players to Switch 2 without losing progress. Includes upgrade tips and troubleshooting.
AI Tactical Companion
Consult with our specialized tactical engine for animal-crossing-new-horizons-switch-2-edition to master the meta instantly.