Ball X Pit Damage Formula Guide: Master Intelligence Scaling and Status Effects
One moment your poison cloud melts a boss in seconds. The next wave, the same setup barely scratches a basic grunt. This whiplash isn't your imagination—Ball X Pit hides an intricate web of calculations that never reach the surface. Understanding the hidden math behind Intelligence scaling, status effect stacking, and non-retroactive damage snapshots is the key to transforming inconsistent numbers into reliable endgame dominance.
Introduction: Why Damage Numbers Feel Inconsistent
One moment your poison cloud melts a boss in seconds. The next wave, the same setup barely scratches a basic grunt. This whiplash isn’t your imagination—Ball X Pit hides an intricate web of calculations that never reach the surface.
The Hidden Math Behind Every Hit
The game’s letter-grade scaling system (D → S) quietly decides how much bonus power each Intelligence point adds. Intelligence doesn’t just boost raw damage; it amplifies AOE abilities, Status Effects, and Passives, making it the backbone of any damage-over-time build.
Damage numbers also fluctuate because of multiplicative amplifiers that stack behind the scenes:
- Radiation: +10 % per stack, capped at 5 stacks (+50 % total)
- Frostburn: +25 % flat bonus, capped at 4 stacks
- Disease: +X % per stack, capped at 8 stacks
- Bleed: stacks up to 24 times, with Hemorrhage triggering at 12+ stacks for 20 % of the target’s current HP
Why Your Dots Sometimes Stop Scaling
A critical quirk: scaling is not retroactive. If you apply bleed at low Intelligence and then raise the stat, the existing ticks won’t update. The formula Total Damage = (Base + Stat Scaling) × (1 + Sum of Amplifiers) only snapshots at the moment of application.
Add in enemy resistances and unpredictable spawn patterns, and the same build can look overpowered one round and underwhelming the next.
Intelligence Scaling: The Core Damage Multiplier
Understanding the 'D' Scaling Notation
Letter grades in Elden Ring aren't just flavor—they're shorthand for precise mathematical multipliers. Scaling grades: E through S represent hidden values that determine how much bonus damage each Intelligence point provides.
- E scaling: Multiplier below 0.25 (minimal Intelligence bonus)
- D scaling: Multiplier between 0.25-0.5999 (moderate Intelligence bonus)
- Practical impact: At 40 Intelligence, E scaling adds +10 damage while D scaling adds +20 damage—effectively doubling your Intelligence investment
The jump from E to D scaling represents a significant power spike for any Intelligence-focused build. These letter grades simplify complex calculations happening behind the scenes.
How to Improve Your Intelligence Scaling
Transforming your weapon's scaling from E to D—or even higher—requires strategic upgrades and affinity choices. Priority upgrades: Focus on these methods to maximize your Intelligence investment.
- Smithing Stone upgrades: Improve both base damage and scaling values, potentially advancing from D to C, B, or A scaling
- Magic/Cold affinity: Apply through Ashes of War to add Intelligence scaling or boost existing scaling from E to B or A grade
- Specialized staves:
- Meteorite Staff: S-tier Intelligence scaling at +0 (best early-game option)
- Carian Regal Scepter: Reaches B scaling at 60 Intelligence
- Lusat's Glintstone Staff: Achieves B scaling at 52 Intelligence
- Hybrid weapons: Dark Moon Greatsword and Moonveil naturally achieve C Intelligence scaling for melee/magic builds
- Temporary boosts: Use Stargazer Heirloom talisman or Twinsage Glintstone Crown to meet Intelligence requirements for better scaling
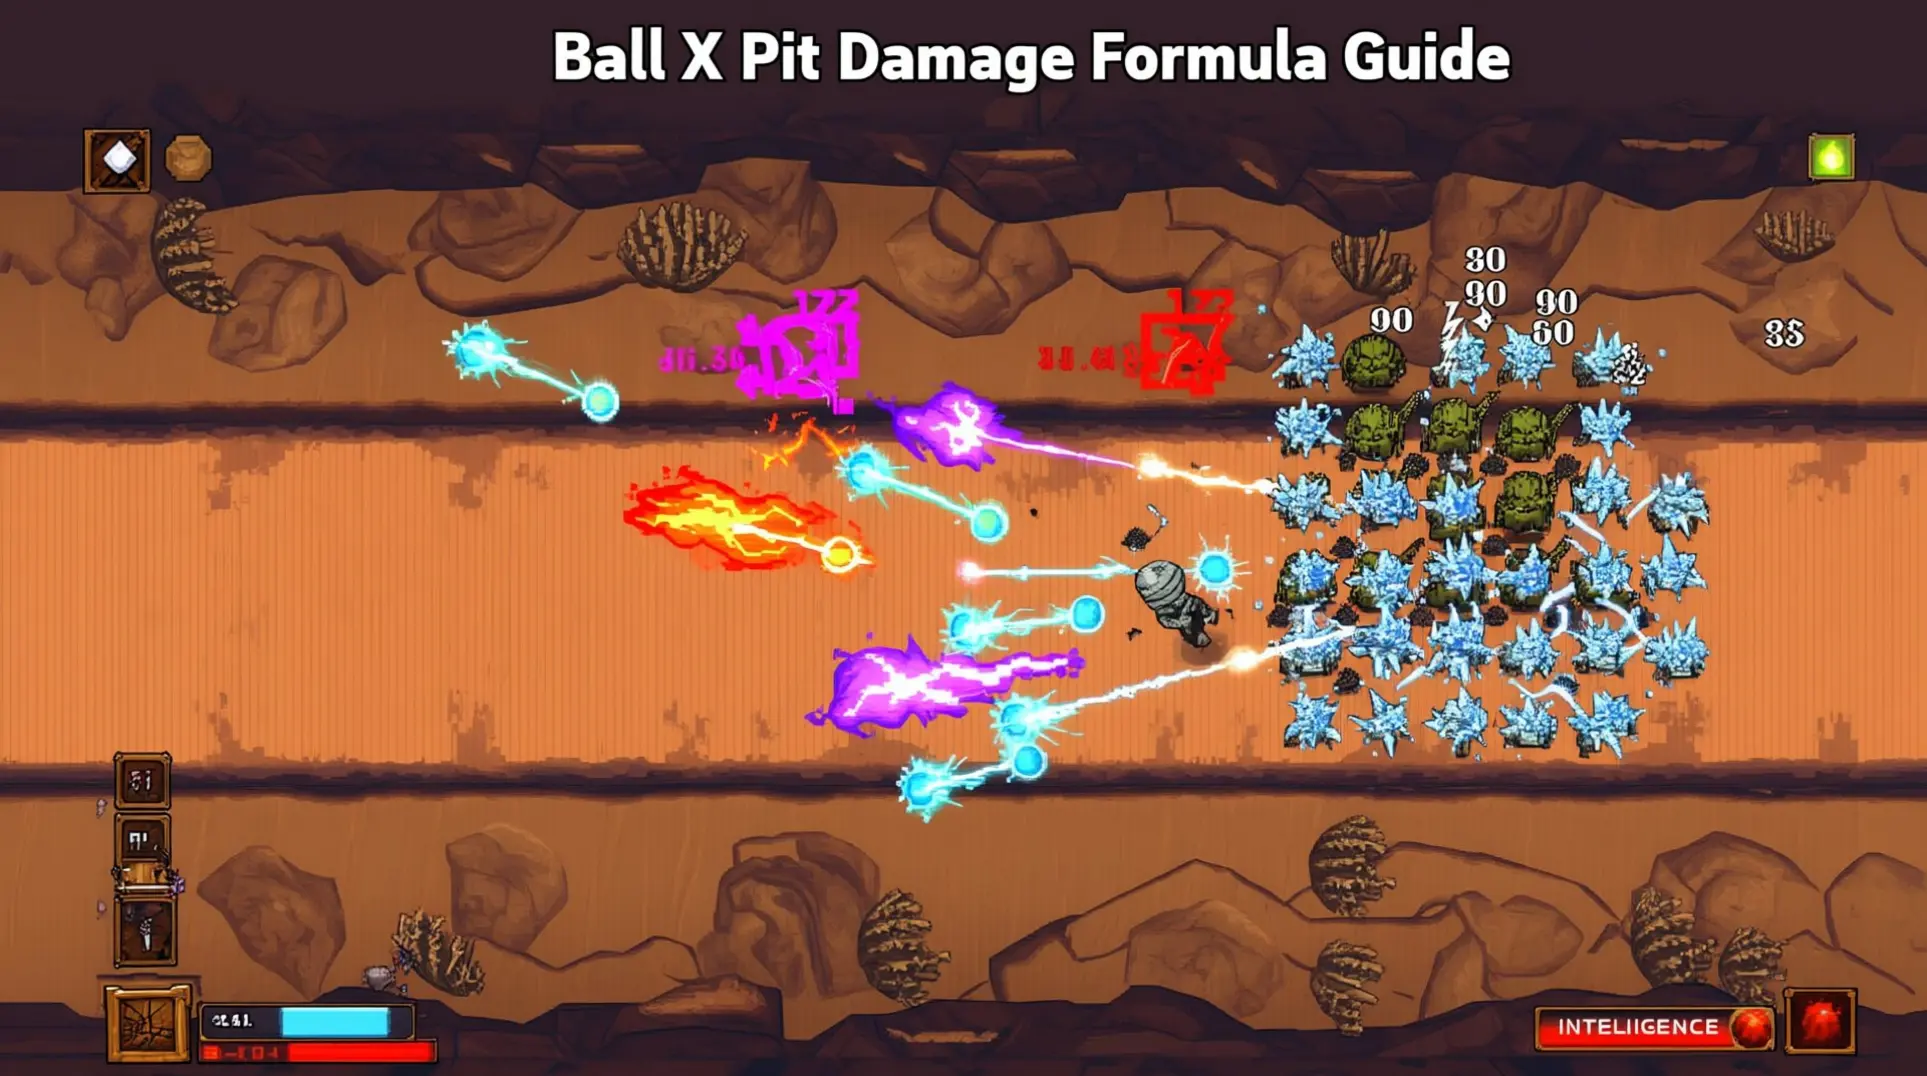
Status Effect Stacking Mechanics
Radiation Stacking Formula
Every hit from Radiation Beam adds one Radiation stack that deals 24–48 damage on application. Each stack amplifies all incoming damage by 10%, capping at 5 stacks for a total 50% damage increase. Stacks persist for 15 seconds and refresh their timer whenever a new stack lands. Nuclear Bomb can spread these stacks across a wide area, making it the fastest way to reach the 5-stack ceiling on multiple enemies.
Frostburn and Bleed Interactions
Frostburn from Frozen Flame applies up to 4 stacks, each lasting 20 seconds and boosting all damage taken by 25% while ticking for 8–12 damage per second. Bleed has no duration limit and grants every other ball +1 damage per stack. Basic Bleed balls add 2 stacks per hit (8-stack cap), while Haemorrhage adds 3 per hit. Leech can push Bleed to 24 stacks by attaching parasites that add 2 stacks every second. The 25% Frostburn amplification multiplies with Bleed’s flat +1 damage, creating explosive scaling when both effects are stacked together.
Maximum Stack Limits and Reset Mechanics
- Radiation: 5-stack cap, 15-second refresh timer
- Frostburn: 4-stack cap, 20-second refresh timer
- Bleed:
- Base ball – 8-stack cap, infinite duration
- Leech – raises cap to 24 stacks, infinite duration
- Haemorrhage: consumes all Bleed stacks at 12+ for 20% current-HP burst
- Overgrowth: detonates at 3 “Stacks” in a 3×3 zone after 3 seconds
Spawner Damage Calculations
Base Ball Damage vs. Upgraded Damage
The Iron Ball transforms into the Wrecking Ball when combined with the Armor passive item at maximum level. This evolution represents a significant power spike, following the game's pattern where evolved weapons inherit base stats while adding powerful effects.
| Weapon Type | Damage Type | Scaling Factor | Example Increase |
|---|---|---|---|
| Iron Ball | Base damage | Static | Standard projectile damage |
| Wrecking Ball | Retaliatory damage | +10% per Armor point | Armor stat directly multiplies output |
| Whip (reference) | Base damage | 10 | Bloody Tear evolution jumps to 40 damage |
The Wrecking Ball's retaliatory damage mechanic makes it unique among spawner weapons. Each point of Armor increases its damage output by 10%, creating exponential scaling potential for defensive builds.
Spawn Rate vs. Damage Per Hit Optimization
Spawn rate upgrades increase both simultaneous mob spawns and their generation frequency. This creates a fundamental choice between quantity and quality approaches.
Area-of-effect weapons thrive with faster spawn rates, as screen-wide damage prevents overwhelming enemy density. Conversely, single-target weapons perform better with slower spawns, maximizing damage per hit without waste.
Optimization strategies vary by playstyle:
- Aggressive players benefit from rapid spawns paired with AoE weapons
- Defensive builds favor slower spawns with high-damage per hit weapons like the Wrecking Ball
- Armor stacking synergizes exceptionally well with retaliatory damage mechanics
The end-screen DPS figures can be misleading, as they're calculated from weapon acquisition time rather than reflecting true damage potential. This makes practical testing essential for finding your optimal balance between spawn rate and damage per hit.
Damage Amplification Formulas
Intelligence × Status Effect Multipliers
Intelligence scaling for magic damage operates through soft caps at 20, 50, and 80, with diminishing returns beyond each threshold. However, this scaling applies exclusively to the magic damage component of Cold affinity weapons, not to status effect buildup itself.
Frostbite buildup remains fixed regardless of Intelligence level, determined solely by the weapon or spell's base application rate. Cold affinity weapons gain Intelligence scaling for their magic damage while maintaining consistent Frostbite buildup. The total attack power formula for Cold weapons follows: (Base Physical Damage × Strength/Dexterity Scaling) + (Base Magic Damage × Intelligence Scaling).
It's crucial to note that status effect scaling only occurs for bleed, poison, sleep, and madness, and exclusively when weapons possess Arcane scaling. Intelligence has no impact on these status effects.
Practical Damage Calculation Examples
- Astrologer vs Tree Sentinel: Starting staff (Sorcery Scaling 115) deals 100 raw damage, reduced to 80 after 20% magic negation
- High Intelligence Build: At Intelligence 80 with S-scaling staff (Sorcery Scaling ~300), same spell deals significantly more damage despite identical 20% negation
- Cold Weapon Progression: Intelligence 20 provides substantial damage boost, 21-50 gives moderate gains, 51-80 gives minimal returns per level
- Scaling Tier Impact: Weapons with B Intelligence scaling under Cold affinity (like Lance) benefit more from Intelligence investment than typical C/D scaling weapons
- Two-Step Calculation: Damage calculation involves attack power vs enemy flat defense, followed by percentage-based negation
Character Build Priority Guide
Optimizing your character for Wave 20+ requires precise stat allocation. The meta heavily favors offense over defense, making damage scaling the primary focus.
Stat Priority Order
- Intelligence: Top priority - amplifies status effect damage (poison, frostburn, radiation) and baby ball damage for late-game scaling
- Strength: Secondary focus - provides direct ball damage increase for consistent early-mid game performance
- Endurance: Lowest priority - increases health pool but follows the "best defense is good offense" strategy
Evolution Build Recommendations
The Warrior + Bomb evolution build dominates high-wave survival. This combination balances AoE damage output with essential survivability mechanics.
For Vampire characters, focus on wide coverage builds using Blizzard (Freeze + Lightning) and Magma (Burn + Earthquake) to maximize area control and damage over time effects.
Ball Evolution Combinations for Maximum DPS
The following table ranks the most effective fusion combinations for damage-focused builds:
| Evolution | Fusion Formula | Damage Multiplier | Special Effect |
|---|---|---|---|
| Satan | Incubus + Succubus | 4.0x | Ultimate dark evolution |
| Nosferatu | Vampire Lord + Mosquito King | 3.8x | Massive lifesteal |
| Black Hole | Sun + Dark | 3.5x | Gravitational pull groups enemies |
| Nuclear Bomb | Bomb + Poison | 3.0x | Massive AoE explosion with radiation stacks |
| Holy Laser | Laser Horizontal + Laser Vertical | 2.5x | Hits entire rows/columns |
| Bomb | Burn + Iron | 2.0x | Recommended first evolution every run |
| Magma | Burn + Earthquake | 1.8x | Ground-based AoE with lingering damage |
| Blizzard | Freeze + Lightning | 1.7x | Radius freeze with AoE damage |
| Sandstorm | Earthquake + Wind | 1.6x | Lingering vortex with slow effect |
Pro Tip: Combine high-damage balls like Bomb/Nuke/Dark with propagation effects (Swarm/Clone) to multiply DPS exponentially through chain reactions.
Conclusion: Mastering Ball X Pit's Damage Formula
Mastering Ball X Pit's damage formula means embracing non-retroactive scaling, stacking multiplicative amplifiers like Radiation and Frostburn, and prioritizing Intelligence over raw Strength. The same build can look broken or useless depending on when you apply your DoTs. Test your combos, snapshot your stats wisely, and watch your DPS become truly exponential.
More Ball-x-Pit Guides

The Ultimate Ball x Pit Guide: Mastering Evolution, Fusion, and The Cohabitants
Master Ball x Pit with our comprehensive guide covering The Cohabitants' ball duplication, top evolution combinations like Blizzard and Virus, advanced fusion strategies, and expert gameplay tips.

Ball X Pit Hidden Mechanics Guide: Master Undocumented Systems for Wave 20+
Unlock Ball X Pit's secret mechanics, damage multipliers, and hidden evolutions to dominate waves 20+ with strategic mastery.

The Ultimate Physicist Guide for Ball X Pit (2025 Meta)
Master The Physicist's gravity control in Ball X Pit. Learn best evolutions, fusion combos, positioning strategies, and 2025 meta builds for competitive gameplay.
AI Tactical Companion
Consult with our specialized tactical engine for Ball-x-Pit to master the meta instantly.