Octopath Traveler 0 Endings Guide: How to Unlock Normal, True, and Bad Endings
Octopath Traveler 0 offers more than one conclusion to its epic journey, but unlocking its full story requires navigating specific, hidden paths. Whether you're aiming for the complete finale or just want to avoid a narrative trap, understanding the requirements for each ending is crucial. This guide breaks down the Normal, True, and Bad endings, detailing exactly what you need to do to see them all.
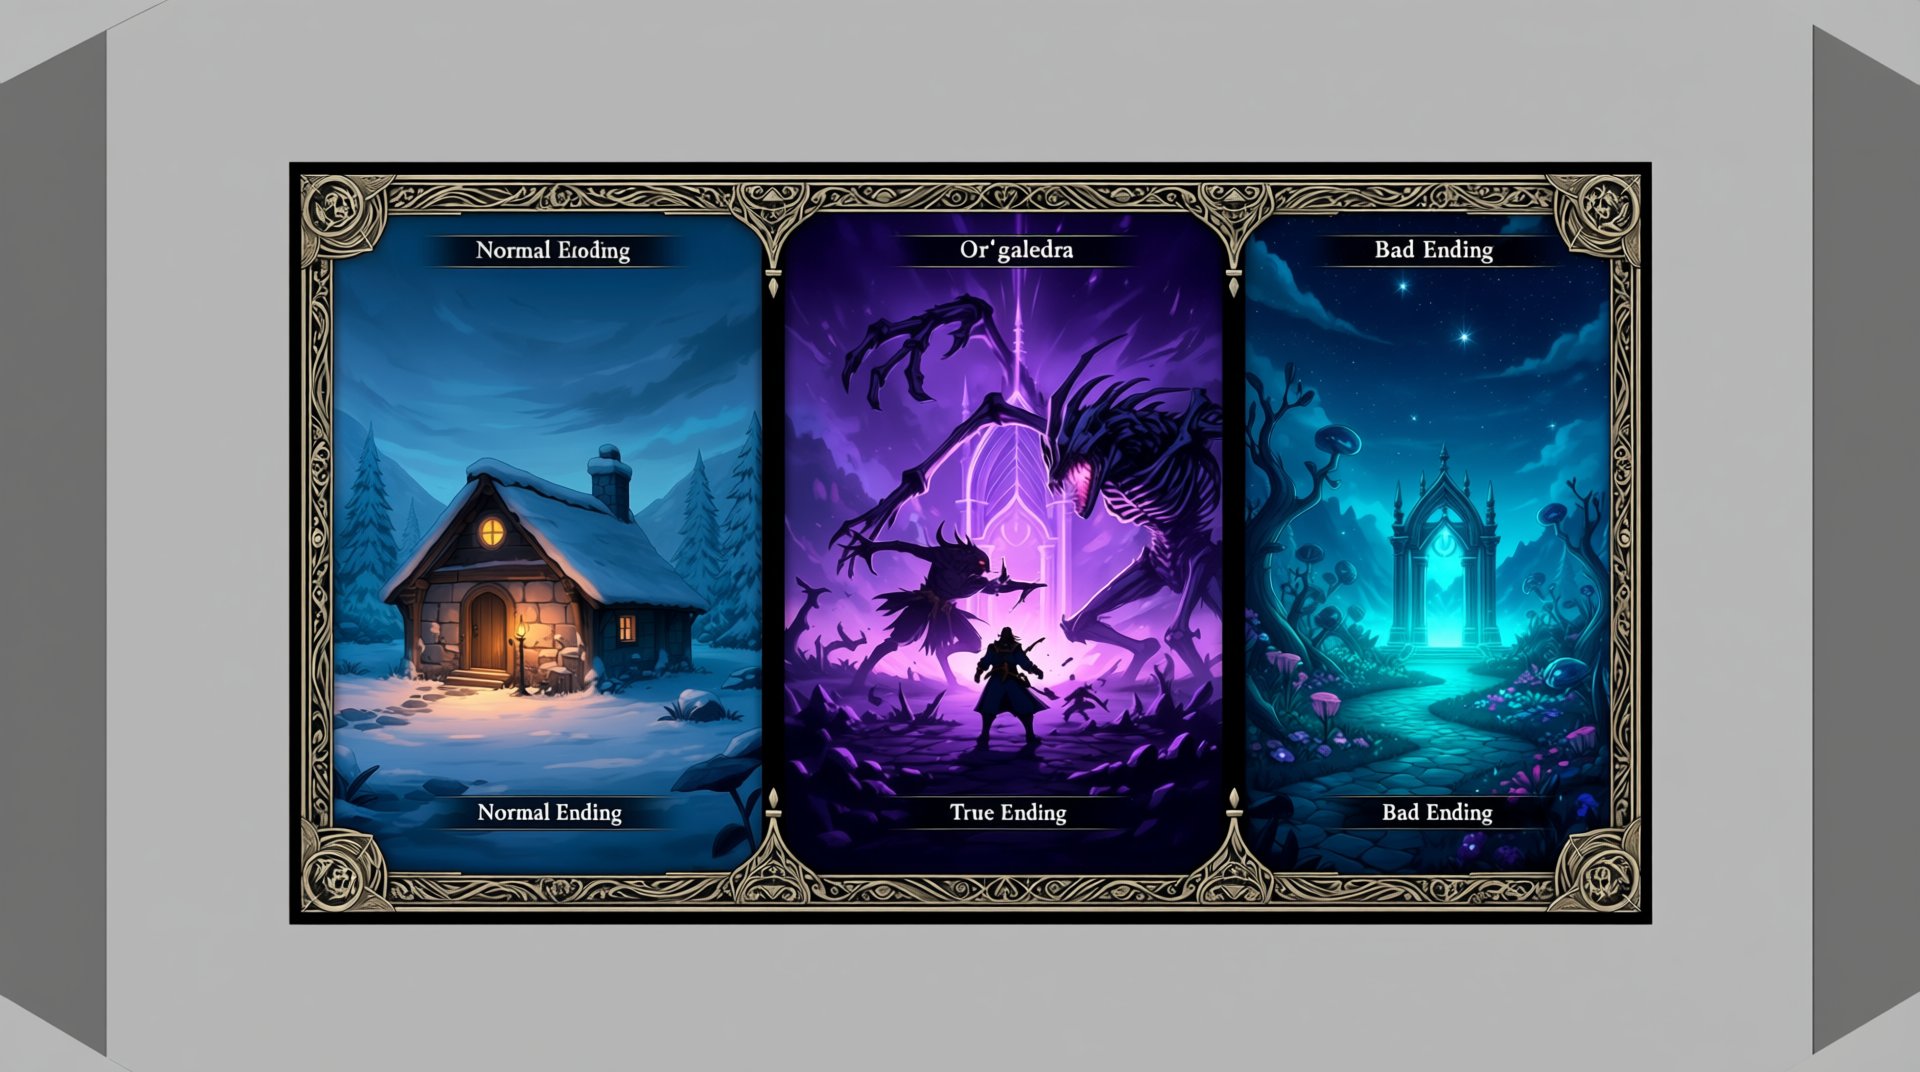
Understanding Octopath Traveler 0's Three Endings
Normal Ending: The Default Conclusion
The normal ending is what you'll get if you just push through the main story without any extra steps. Once you finish Chapter 8: At Journey's End and beat the Bestower of All, that's it - you've reached the default conclusion. This version is noticeably shorter and skips the additional cutscenes you'll find in the True Ending, so it feels more abrupt.
Here's the good news: the game doesn't trap you here. After the credits roll, you'll get a star-marked save file, which means you can reload right back into the world to chase post-game content or go for the True Ending instead.
True Ending: The Complete Finale
If you want the real conclusion, you'll need to put in some extra work before facing the final boss. First, you have to track down and complete Aelfric's Trial at the Flamebearer's Shrine - this is non-negotiable. Without ticking that box, the True Ending won't trigger no matter what you do in Chapter 8.
Once you've cleared the trial and beaten the Bestower of All, you'll get a crucial choice during the final sequence. You need to use the Ring to illuminate Sazantos' family; this specific action is what opens the path to the secret boss Or'galdera. Beat him, and you'll see the full ending with all the story payoffs you're after. Plus, you'll snag the 'Traveler From Zero' PlayStation trophy for your trouble.
Bad Ending: The Utopian Trap
⚠️ Warning: This ending is a trap, but it's not permanent.
During the Bestower of All Chapter 8, Sazantos will offer you a tempting deal: stay in Wishvale's perfect utopia and abandon your quest. If you say yes twice, the game ends immediately and dumps you back to the title screen - you won't even see the final boss. It's a brutal narrative gut-punch, but don't panic. You can simply reload a previous save and get right back on track for either the Normal or True Ending. Think of it as a 'what if' scenario rather than a real ending lockout.
Phase 1: Prerequisites & Story Progression
First things first - you can't just waltz into the true ending. You need to finish the Bestower of All questline, which means the world map must show The Gate of Orsa sitting in that north-western Frostlands tile. If you're not seeing it, double-check your quest log for Aelfric's Trial; if it's missing, just crash at an inn until the dream cut-scene with the Archmagus triggers, which usually kicks everything back into gear.
Here's the actual quest flow: grab Bestower of All from the hooded pilgrim outside Crossford, then knock out three pilgrimages at Flamebearer's Shrine, Seaside Shrine, and Snowpeak Shrine. Once those are done, you'll hit a story moment in a snow cabin north of Snowpeak Shrine where Sazantos offers you a perfect world. Decline it - if you accept, you're locked into the bad ending, no take-backs.
After leaving the cabin, The Gate of Orsa spawns on the frozen lake tile. Save before you enter, because this dungeon is no joke. It's split into three zones (Base Ridge, Crystal Bridges, and Zenith Hall), and you'll want to grab the Archmagus Robe and Forbidden Tomes from chests along the way. The boss, Orsazantos, packs 185k HP, 8k P./E. Def, and 9 shields, weak to Sword, Spear, Fire, and Light. Once you knock him to 50%, he starts acting twice per turn and swaps weaknesses to Dagger, Axe, Ice, and Dark, so plan your party flexibly.
After the fight, interact with the flaming altar behind the loot chest and pick 'Offer the Mark' - this reopens Flamebearer's Shrine as a level 90 end-game dungeon, which you'll need for what comes next.
Phase 2: Aelfric's Trial at Flamebearer's Shrine
Backtrack to Flamebearer's Shrine: Sanctum in the Frostlands and poke the blue-flame brazier to accept the trial. This is where things get spicy.
Aelfric the Flamebringer is a monster: roughly 520k HP, 12 shields that reset to 14 after his first break and cap at 16 in the final phase, with speeds of 210 → 240 → 270 as he gets weaker. His damage skews 70% Fire, 25% Physical, and 5% Almighty - expect moves like Sacred Flame, Crimson Pillar, Flame-Wreathed Blade, Rite of Rekindling, and the infamous Inferno Ascension.
The gimmick? He summons Sacred Flames that buff him, but they also deal 3% max-HP recoil to Aelfric every turn. So you've got a choice: burn them down fast or leave one alive to accelerate his HP loss. Most guides suggest the latter once you understand the rhythm.
You'll want your party around levels 85–90. Tank with Olberic Apothecary or Gilderoy Cleric - someone who can soak Fire damage. Burst DPS should be Scarecrow Scholar or Therion Scholar for elemental nukes. Bring a buffer like Lynette or Mabel, and a solid healer (Ophilia or Fabio). Slap the Flamebearer's Ring (base) on your tank for 20% Fire reduction, which softens those Crimson Pillar and Inferno Ascension spikes.
Phase A (100%→70%): Buff Elem. Def, erase two Sacred Flames with 3-hit Fire/Wind, break on turn 4, then unload physical or lightning while he's down. Phase B (70%→35%): His speed jumps to 240 and he opens with Rite of Rekindling (+2 shields); maintain flame control and regenerate every three turns. Phase C (35%→0%): Speed hits 270, shields cap at 16; if your party HP stays above 70%, ignore the flames and focus on breaking all 16 shields, using a BP battery to land two 4-boost attacks in one break window.
Winning drops the Flamebearer's Ring α (Fire dmg +35%, Fire resist +30%, speed +40) and flags you for the true ending. Don't forget to equip it.
Phase 3: Illuminate Path Action & Sazantos' Family
Defeating Aelfric automatically gives you the Illuminate Path Action - no extra steps needed. Now you need to haul back to that snowy cabin in Wishvale Snowfields, and this sequence is critical.
Inside, use Illuminate on the baby first, then Pharamea, then finally Sazantos. Each reveals a hidden memory; the baby's scene specifically shows Pharamea handing the Divine Ring of Souls to Sazantos, which flags him as a permanent companion. Miss this cabin sequence and you're locked out of both the true ending and the 'Traveler from Zero' trophy, so don't dawdle.
After illuminating all three, Sazantos pledges to stay until the last flame is lit, and the trophy pops. This is your green light to move to the finale.
Phase 4: Or'galdera Joint Battle & Final Confrontation
Here it is: the true ending boss, Or'galdera, waiting at the Altar of Heavenly Peals during the 'At Journey's End' quest.
The twist? It's a Joint Battle, meaning all 36 characters (if you've recruited everyone) participate. The bench isn't safe - everyone needs gear, so don't neglect your B-team.
Or'galdera starts with 99 shields, but after you kill his Void-Sundering Arm and Demonic Spear, it drops to 30. He's always weak to Light. The arm has 17 shields, weak to Lightning/Ice/Fire, but it shuffles weaknesses to physical weapons mid-fight and inflicts Sleep, Paralysis, Bleed, and BP drain. The spear has 10 shields, weak to Swords/Polearms/Daggers, and its Blinding Thrust locks your front row from switching for three turns.
Preparation: Safe entry is Lv 60-65 for the whole roster; a low-man challenge can be done at Lv 55 with optimized jobs. If you're Lv 80+ with basic gear, it's brain-dead easy. Mandatory support skills include Saving Grace (Cleric divine), BP Eater, Surpassing Power, Physical Prowess/Elemental Edge, and Fortitude. Stock Revitalizing Jam or Inspiriting Plums XL for full HP/SP, and give each item user at least two Olives of Life (L) for revives.
A-squad (extremity blitz): Warmaster Olberic, Cleric Ophilia, Merchant Tressa, Hunter H'aanit. B-squad (stun & sustain): Sorcerer Cyrus, Starseer Primrose, Apothecary Alfyn, Thief Therion. For speed tuning, slap +SP nuts on Ophilia and Alfyn so they act at 85-90% of your fastest DPS, and give Tressa a +200-EVA shield plus the 'Mind's Eye' accessory for Sidestep tanking.
Phase flow: Break both extremities simultaneously to stop the 'Rapture' AoE. Once they're down, Galdera's body appears with 12 shields and 199,999 HP. Use Leghold Trap to delay his actions, then unload Winnehild's Battle Cry + Starfall + captured monster hits to finish before he casts 'Divine Majesty' for a full heal. If you see that cast bar, you've taken too long.
Push through, and you'll get the true ending cutscene, the 'Summoned' trophy, and bragging rights forever.
The Secret Lore: Lyblac & Galdera Connection
Lyblac: The Puppet-Mistress Across Centuries
Lyblac isn't just Galdera's daughter - she's a literal piece of him, and Octopath Traveler 0's game files explicitly flag her as 'part of Galdera, the Fallen', confirming she's a bioshaped shard of the god's divinity rather than a separate being. This isn't metaphorical; it's hardcoded.
She operates under the alias Ceraphina the Charitable, using her public identity as Princess Alaune to manipulate events from the shadows. Her goal? Collecting the Crowns of Fame that serve as keys to unseal Galdera. And here's the kicker: when she temporarily vanishes in Chapter 7 of Master of All, she leaves behind those telltale purple-black fire particles - the exact visual effect used for Galdera's essence in the original game. That's not a coincidence; it's a deliberate hint that she's returning to the main body.
Galdera's Timeline: From Sealing to Resurrection
Let's chart this properly: two hundred seventeen years before the original Octopath Traveler, Galdera's flames took form and became Lyblac, his faithful apostle who descended into Orsterra to begin the resurrection plan. But that wasn't a quick scheme - it was the start of centuries of manipulation.
During Octopath Traveler 0's Master of Fame storyline, Lyblac's Ceraphina persona gathers the Crowns of Fame needed to open the Gate of Finis. The rabbit hole goes deeper, though. The Official Complete Guide reveals her long game: founding the Order of the Sacred Flame and orchestrating every single protagonist's chapter in the original game. Every. Single. One.
Now here's where it gets weird. Octopath Traveler 2 treats Galdera's defeat as a self-contained event, advancing Solistia's timeline 5-6 years without even referencing Orsterra's secret ending. So while Lyblac's plan spanned centuries across two games, the third game acts like it never happened.
Gameplay Evidence: Shared Mechanics & Boss Patterns
The lore is one thing, but the gameplay doesn't lie. Lyblac's boss fight in Octopath 0 shares identical mechanics with Galdera's Blade of the Fallen phase from the original game, and the similarities are impossible to ignore.
Her 'Protection' skill grants physical defense augmentation to all enemies for 4 turns - the exact same buff she provides in Galdera's second phase. Then there's 'Enchantment: Darkness', which causes the Blade of the Fallen to inflict Blindness on its next attack, matching the move naming and effect from Octopath Traveler's final boss verbatim.
Here's the smoking gun: in both games, Lyblac is the only component of Galdera that's weak to the Sleep status effect. This isn't random - it reinforces her identity as the 'fragment' that can be put to rest separately from the main body.
And when you finally defeat her in Galdera's phase 2, the 'Veil of Darkness expands' mechanic adds 2 shield points to all remaining parts. That's a direct parallel to her defeat in Octopath 0, where taking her down triggers increased defenses for Or'galdera. The games are mechanically screaming that these are the same entity.
Post-Game Content & Completion Rewards
Permanent Party Members & Character Unlocks
If you shoot for the True Ending, Sazantos sticks around for good. You'll need to finish Aelfric's Trial and - this is key - illuminate his family at the snowy cabin. Once that's done, he's not just a temporary guest anymore; he becomes a permanent member you can swap in and out at any tavern, just like your starting crew.
Trophy/Achievement Unlocks
You'll pick up two trophies automatically just for watching the True Ending credits roll: Traveler from Zero (that's the big Gold one) and Summoned. The good news? All 37 trophies - including 12 hidden ones - can be earned in a single playthrough, so you won't need to grind out multiple runs for that platinum.
Additional Lore & Worldbuilding Revelations
The True Ending doesn't just wrap up your journey - it dumps a truckload of lore that recontextualizes everything. Those Divine Rings? They're not just magic trinkets. Each one acts like a phylactery for the 13 gods, anchoring them to the world and letting them hijack their bearers.
This becomes crystal clear across the Bestower storylines. The Bestower of Wealth reveals the Scarlet Wings guild has been pumping out counterfeit rings to crash the divine economy, while the Bestower of Power shows the Kaiser uniting desert kingdoms through blood-rune experiments that literally siphon divinity from captured ring-bearers - and this is what's cracking Galdera's prison open.
The Bestower of Fame is just as grim: the Chosen One ascends using the Ring of Fame, which directly sets up Galdera's cult from the original Octopath Traveler.
But it's the Bestower of All that ties everything together. All 13 rings merge into the Master Ring, and you're hit with a binary choice: seal them away (which is what happened in OT1's canon) or keep the Master Ring and doom everyone. The 'right' choice is obvious, but the cost stings.
And if you needed proof this whole thing is a prequel, the True Ending cutscene shows Sail - the future Ringbearer of the Fallen - watching from the shadows. That's not a tease; it's confirmation that OT0 is the direct catalyst for Galdera's attempted return in OT1.
Common Questions & Troubleshooting
Can You Get All Endings in One Playthrough?
Good news: you don't need multiple save files to see everything Octopath Traveler 0 has to offer. The game packs three distinct endings - Normal, True, and Bad - and you can watch all of them on the same playthrough without starting over. The key is a single choice right before the final boss.
In the Garden of Sin, you'll stumble across a Strange Monument. Touching it or ignoring it is literally the only thing that decides which credits roll, which means you can beat the game, watch an ending, then loop right back to trigger the next one. No need to replay 60 hours of content just to see a different epilogue.
What Happens If You Miss Aelfric's Trial?
Let's clear up some confusion about Aelfric's Trial, which is what everyone calls the Kindlers of the Flame quest-line. Here's the thing: it's completely optional, and you can reach all three endings without ever lighting a single brazier.
If you do go for it and light the final brazier, you'll get thrown into tough back-to-back boss fights - but don't panic. If you wipe, the game just spits you back out at the Sacred Flame Sanctum entrance with all your gear and levels intact. No penalty whatsoever.
And here's the kicker: even if you beat the final boss without completing the trial, you can still use that Strange Monument in the Garden of Sin to jump back and grab the True Ending. The Normal Ending is basically unmissable on your first clear, so you're never locked out of content.
Recommended Level & Preparation Tips
Before you walk into the Or'Galdera fight with your head held high, you'll want to be around level 60-70. That's the sweet spot where strategies become reliable without turning you into a grinding zombie. Your gear and skills matter way more than raw levels anyway.
For support skills, you absolutely need Saving Grace on everyone - it's non-negotiable. Load up your damage dealers with BP Eater, Second Serving, Physical Prowess or Elemental Prowess, plus Fortitude and Surpassing Power to break the damage cap.
Gear-wise, your Warmaster wants Battle-tested Blade, Giant's Club, or Death Cleaver, while your Hunter needs the Primeval Bow of Storms. Craft armor like Oppressor's Plate until you hit 1,400+ physical defense and 1,200+ elemental defense - otherwise you'll get one-shot.
The cheese strategy? Run a Phase-1 squad with Tressa as Runelord, Therion as Dancer, Ophilia as Cleric, and H'aanit as Hunter to break shields and stack buffs. Then swap to your Phase-2 killers: Warmaster, Scholar, Merchant, and Cleric. Pop Aelfric's Auspices on your Warmaster and unload Winnehild's Battle Cry for a two-turn kill. Done and dusted.
Conclusion
With the right preparation, you can experience every conclusion Octopath Traveler 0 has to offer in a single playthrough. From the abrupt Normal Ending to the lore-rich True Ending, your choices - and your mastery of the game's toughest challenges - determine how the journey concludes. Now that you know the path, the final choice is yours to make.